<?xml version="1.0" encoding="utf-8"?>
<feed xmlns="http://www.w3.org/2005/Atom">

  <title><![CDATA[As a SW/Ops/DB Engineer]]></title>
  <link href="http://tech.riywo.com/atom.xml" rel="self"/>
  <link href="http://tech.riywo.com/"/>
  <updated>2014-12-26T01:21:17+09:00</updated>
  <id>http://tech.riywo.com/</id>
  <author>
    <name><![CDATA[riywo]]></name>
    
  </author>
  <generator uri="http://octopress.org/">Octopress</generator>

  
  <entry>
    <title type="html"><![CDATA[Terraform module for Mesos + Ceph cluster and Packer template]]></title>
    <link href="http://tech.riywo.com/blog/2014/12/25/terraform-module-for-mesos-plus-ceph-cluster-and-packer-template/"/>
    <updated>2014-12-25T23:13:16+09:00</updated>
    <id>http://tech.riywo.com/blog/2014/12/25/terraform-module-for-mesos-plus-ceph-cluster-and-packer-template</id>
    <content type="html"><![CDATA[<p><a href="https://github.com/riywo/mesos-ceph">riywo/mesos-ceph</a></p>

<p>I&rsquo;ve just tried to use <a href="https://www.terraform.io">Terraform</a> and <a href="https://www.packer.io">Packer</a> to create a <a href="http://mesos.apache.org">Mesos</a> + <a href="http://ceph.com">Ceph</a> cluster in <a href="http://aws.amazon.com">AWS</a>. Yes, I know <a href="http://mesosphere.com">Mesosphere</a> applications supporting deployment of Mesos cluster in some IaaS (see <a href="http://mesosphere.com/docs/getting-started">Getting Started</a>), but I&rsquo;d like to understand what&rsquo;s going on there. So, I did it by Terraform and Packer. I&rsquo;m gonna explain a little bit more about this.</p>

<p>Through this work, I&rsquo;ve learned a lot of things. I will write something below too.</p>

<!-- more -->


<h2>What is this?</h2>

<p>This repository includes Terraform module and Packer template. Terraform module will manage a VPC subnet, igw, sg, etc. and instances below:</p>

<ul>
<li>admin

<ul>
<li>ssh gateway</li>
<li>run <code>ceph-deploy</code></li>
</ul>
</li>
<li>master1, master2, master3

<ul>
<li>mesos master</li>
<li>marathon</li>
<li>ceph mon</li>
<li>ceph mds</li>
<li>mount cephfs</li>
</ul>
</li>
<li>slaves (default 3)

<ul>
<li>mesos slave</li>
<li>ceph osd with EBS</li>
<li>mount cephfs</li>
</ul>
</li>
</ul>


<p>Why not only Mesos, did I manage Ceph cluster? In Mesos, I&rsquo;d like to use a shared file system because:</p>

<ul>
<li>Share executer files, etc.</li>
<li>Control cluster software on Mesos</li>
<li>Save uploaded files to Mesos tasks (ex. image files to blog apps)</li>
</ul>


<p>Or just for fun :)</p>

<h2>How to use?</h2>

<p>Very simple, make your own terraform config like below:</p>

<figure class='code'><div class="highlight"><table><tr><td class="gutter"><pre class="line-numbers"><span class='line-number'>1</span>
<span class='line-number'>2</span>
<span class='line-number'>3</span>
<span class='line-number'>4</span>
<span class='line-number'>5</span>
<span class='line-number'>6</span>
<span class='line-number'>7</span>
<span class='line-number'>8</span>
<span class='line-number'>9</span>
<span class='line-number'>10</span>
<span class='line-number'>11</span>
<span class='line-number'>12</span>
<span class='line-number'>13</span>
<span class='line-number'>14</span>
<span class='line-number'>15</span>
<span class='line-number'>16</span>
<span class='line-number'>17</span>
<span class='line-number'>18</span>
<span class='line-number'>19</span>
</pre></td><td class='code'><pre><code class=''><span class='line'>provider "aws" {}
</span><span class='line'>
</span><span class='line'>resource "aws_vpc" "default" {
</span><span class='line'>        cidr_block           = "10.0.0.0/16"
</span><span class='line'>        enable_dns_support   = true
</span><span class='line'>        enable_dns_hostnames = true
</span><span class='line'>}
</span><span class='line'>
</span><span class='line'>module "mesos_ceph" {
</span><span class='line'>        source                   = "github.com/riywo/mesos-ceph/terraform"
</span><span class='line'>        vpc_id                   = "${aws_vpc.default.id}"
</span><span class='line'>        key_name                 = "${var.key_name}"
</span><span class='line'>        key_path                 = "${var.key_path}"
</span><span class='line'>        subnet_availability_zone = "us-east-1e"
</span><span class='line'>        subnet_cidr_block        = "10.0.1.0/24"
</span><span class='line'>        master1_ip               = "10.0.1.11"
</span><span class='line'>        master2_ip               = "10.0.1.12"
</span><span class='line'>        master3_ip               = "10.0.1.13"
</span><span class='line'>}</span></code></pre></td></tr></table></div></figure>


<p>Note: You can use environment variables for AWS configuration and <code>terraform.tfvars</code> file for variables.</p>

<figure class='code'><div class="highlight"><table><tr><td class="gutter"><pre class="line-numbers"><span class='line-number'>1</span>
<span class='line-number'>2</span>
<span class='line-number'>3</span>
<span class='line-number'>4</span>
<span class='line-number'>5</span>
<span class='line-number'>6</span>
<span class='line-number'>7</span>
</pre></td><td class='code'><pre><code class=''><span class='line'>export AWS_REGION=us-east-1
</span><span class='line'>export AWS_ACCESS_KEY=AAAAAAAAAA
</span><span class='line'>export AWS_SECRET_KEY=000000000000000000
</span><span class='line'>
</span><span class='line'>$ cat terraform.tfvars
</span><span class='line'>key_name = "your key name"
</span><span class='line'>key_path = "/path/to/private_pem_file"</span></code></pre></td></tr></table></div></figure>


<p>First, you should download the module using <code>terraform get</code></p>

<figure class='code'><div class="highlight"><table><tr><td class="gutter"><pre class="line-numbers"><span class='line-number'>1</span>
<span class='line-number'>2</span>
</pre></td><td class='code'><pre><code class=''><span class='line'>$ terraform get
</span><span class='line'>Get: git::https://github.com/riywo/mesos-ceph.git</span></code></pre></td></tr></table></div></figure>


<p>Then, you can check <code>terraform plan</code>. To show resources in module, you have to provide <code>-module-depth</code> option.</p>

<figure class='code'><div class="highlight"><table><tr><td class="gutter"><pre class="line-numbers"><span class='line-number'>1</span>
<span class='line-number'>2</span>
<span class='line-number'>3</span>
<span class='line-number'>4</span>
<span class='line-number'>5</span>
<span class='line-number'>6</span>
<span class='line-number'>7</span>
<span class='line-number'>8</span>
<span class='line-number'>9</span>
<span class='line-number'>10</span>
<span class='line-number'>11</span>
<span class='line-number'>12</span>
<span class='line-number'>13</span>
<span class='line-number'>14</span>
<span class='line-number'>15</span>
<span class='line-number'>16</span>
<span class='line-number'>17</span>
<span class='line-number'>18</span>
<span class='line-number'>19</span>
<span class='line-number'>20</span>
<span class='line-number'>21</span>
<span class='line-number'>22</span>
<span class='line-number'>23</span>
<span class='line-number'>24</span>
<span class='line-number'>25</span>
<span class='line-number'>26</span>
<span class='line-number'>27</span>
<span class='line-number'>28</span>
<span class='line-number'>29</span>
<span class='line-number'>30</span>
<span class='line-number'>31</span>
<span class='line-number'>32</span>
<span class='line-number'>33</span>
<span class='line-number'>34</span>
<span class='line-number'>35</span>
<span class='line-number'>36</span>
<span class='line-number'>37</span>
<span class='line-number'>38</span>
<span class='line-number'>39</span>
<span class='line-number'>40</span>
<span class='line-number'>41</span>
<span class='line-number'>42</span>
<span class='line-number'>43</span>
<span class='line-number'>44</span>
<span class='line-number'>45</span>
<span class='line-number'>46</span>
<span class='line-number'>47</span>
<span class='line-number'>48</span>
<span class='line-number'>49</span>
<span class='line-number'>50</span>
<span class='line-number'>51</span>
<span class='line-number'>52</span>
<span class='line-number'>53</span>
<span class='line-number'>54</span>
<span class='line-number'>55</span>
<span class='line-number'>56</span>
<span class='line-number'>57</span>
<span class='line-number'>58</span>
<span class='line-number'>59</span>
<span class='line-number'>60</span>
<span class='line-number'>61</span>
<span class='line-number'>62</span>
<span class='line-number'>63</span>
<span class='line-number'>64</span>
<span class='line-number'>65</span>
<span class='line-number'>66</span>
<span class='line-number'>67</span>
<span class='line-number'>68</span>
<span class='line-number'>69</span>
<span class='line-number'>70</span>
<span class='line-number'>71</span>
<span class='line-number'>72</span>
<span class='line-number'>73</span>
<span class='line-number'>74</span>
<span class='line-number'>75</span>
<span class='line-number'>76</span>
<span class='line-number'>77</span>
<span class='line-number'>78</span>
<span class='line-number'>79</span>
<span class='line-number'>80</span>
<span class='line-number'>81</span>
<span class='line-number'>82</span>
<span class='line-number'>83</span>
<span class='line-number'>84</span>
<span class='line-number'>85</span>
<span class='line-number'>86</span>
<span class='line-number'>87</span>
<span class='line-number'>88</span>
<span class='line-number'>89</span>
<span class='line-number'>90</span>
<span class='line-number'>91</span>
<span class='line-number'>92</span>
<span class='line-number'>93</span>
<span class='line-number'>94</span>
<span class='line-number'>95</span>
<span class='line-number'>96</span>
<span class='line-number'>97</span>
<span class='line-number'>98</span>
<span class='line-number'>99</span>
<span class='line-number'>100</span>
<span class='line-number'>101</span>
<span class='line-number'>102</span>
<span class='line-number'>103</span>
<span class='line-number'>104</span>
<span class='line-number'>105</span>
<span class='line-number'>106</span>
<span class='line-number'>107</span>
<span class='line-number'>108</span>
<span class='line-number'>109</span>
<span class='line-number'>110</span>
<span class='line-number'>111</span>
<span class='line-number'>112</span>
<span class='line-number'>113</span>
<span class='line-number'>114</span>
<span class='line-number'>115</span>
<span class='line-number'>116</span>
<span class='line-number'>117</span>
<span class='line-number'>118</span>
<span class='line-number'>119</span>
<span class='line-number'>120</span>
<span class='line-number'>121</span>
<span class='line-number'>122</span>
<span class='line-number'>123</span>
<span class='line-number'>124</span>
<span class='line-number'>125</span>
<span class='line-number'>126</span>
<span class='line-number'>127</span>
<span class='line-number'>128</span>
<span class='line-number'>129</span>
<span class='line-number'>130</span>
<span class='line-number'>131</span>
<span class='line-number'>132</span>
<span class='line-number'>133</span>
<span class='line-number'>134</span>
<span class='line-number'>135</span>
<span class='line-number'>136</span>
<span class='line-number'>137</span>
<span class='line-number'>138</span>
<span class='line-number'>139</span>
<span class='line-number'>140</span>
<span class='line-number'>141</span>
<span class='line-number'>142</span>
<span class='line-number'>143</span>
<span class='line-number'>144</span>
<span class='line-number'>145</span>
<span class='line-number'>146</span>
<span class='line-number'>147</span>
<span class='line-number'>148</span>
<span class='line-number'>149</span>
<span class='line-number'>150</span>
<span class='line-number'>151</span>
<span class='line-number'>152</span>
<span class='line-number'>153</span>
<span class='line-number'>154</span>
<span class='line-number'>155</span>
<span class='line-number'>156</span>
<span class='line-number'>157</span>
<span class='line-number'>158</span>
<span class='line-number'>159</span>
<span class='line-number'>160</span>
<span class='line-number'>161</span>
<span class='line-number'>162</span>
<span class='line-number'>163</span>
<span class='line-number'>164</span>
<span class='line-number'>165</span>
<span class='line-number'>166</span>
<span class='line-number'>167</span>
<span class='line-number'>168</span>
<span class='line-number'>169</span>
<span class='line-number'>170</span>
<span class='line-number'>171</span>
<span class='line-number'>172</span>
<span class='line-number'>173</span>
<span class='line-number'>174</span>
<span class='line-number'>175</span>
<span class='line-number'>176</span>
<span class='line-number'>177</span>
<span class='line-number'>178</span>
<span class='line-number'>179</span>
<span class='line-number'>180</span>
<span class='line-number'>181</span>
<span class='line-number'>182</span>
<span class='line-number'>183</span>
<span class='line-number'>184</span>
<span class='line-number'>185</span>
<span class='line-number'>186</span>
<span class='line-number'>187</span>
<span class='line-number'>188</span>
<span class='line-number'>189</span>
<span class='line-number'>190</span>
<span class='line-number'>191</span>
<span class='line-number'>192</span>
<span class='line-number'>193</span>
<span class='line-number'>194</span>
<span class='line-number'>195</span>
<span class='line-number'>196</span>
<span class='line-number'>197</span>
<span class='line-number'>198</span>
<span class='line-number'>199</span>
<span class='line-number'>200</span>
<span class='line-number'>201</span>
<span class='line-number'>202</span>
<span class='line-number'>203</span>
<span class='line-number'>204</span>
<span class='line-number'>205</span>
<span class='line-number'>206</span>
<span class='line-number'>207</span>
<span class='line-number'>208</span>
<span class='line-number'>209</span>
<span class='line-number'>210</span>
<span class='line-number'>211</span>
<span class='line-number'>212</span>
<span class='line-number'>213</span>
<span class='line-number'>214</span>
<span class='line-number'>215</span>
<span class='line-number'>216</span>
<span class='line-number'>217</span>
<span class='line-number'>218</span>
<span class='line-number'>219</span>
<span class='line-number'>220</span>
<span class='line-number'>221</span>
<span class='line-number'>222</span>
<span class='line-number'>223</span>
<span class='line-number'>224</span>
<span class='line-number'>225</span>
<span class='line-number'>226</span>
<span class='line-number'>227</span>
<span class='line-number'>228</span>
<span class='line-number'>229</span>
</pre></td><td class='code'><pre><code class=''><span class='line'>$ terraform plan -module-depth -1
</span><span class='line'>Refreshing Terraform state prior to plan...
</span><span class='line'>
</span><span class='line'>The Terraform execution plan has been generated and is shown below.
</span><span class='line'>Resources are shown in alphabetical order for quick scanning. Green resources
</span><span class='line'>will be created (or destroyed and then created if an existing resource
</span><span class='line'>exists), yellow resources are being changed in-place, and red resources
</span><span class='line'>will be destroyed.
</span><span class='line'>
</span><span class='line'>Note: You didn't specify an "-out" parameter to save this plan, so when
</span><span class='line'>"apply" is called, Terraform can't guarantee this is what will execute.
</span><span class='line'>
</span><span class='line'>+ aws_vpc.default
</span><span class='line'>    cidr_block:           "" =&gt; "10.0.0.0/16"
</span><span class='line'>    enable_dns_hostnames: "" =&gt; "1"
</span><span class='line'>    enable_dns_support:   "" =&gt; "1"
</span><span class='line'>    main_route_table_id:  "" =&gt; "&lt;computed&gt;"
</span><span class='line'>
</span><span class='line'>+ module.mesos.aws_instance.admin
</span><span class='line'>    ami:               "" =&gt; "ami-06ef816e"
</span><span class='line'>    availability_zone: "" =&gt; "&lt;computed&gt;"
</span><span class='line'>    instance_type:     "" =&gt; "t2.micro"
</span><span class='line'>    key_name:          "" =&gt; "your key name"
</span><span class='line'>    private_dns:       "" =&gt; "&lt;computed&gt;"
</span><span class='line'>    private_ip:        "" =&gt; "&lt;computed&gt;"
</span><span class='line'>    public_dns:        "" =&gt; "&lt;computed&gt;"
</span><span class='line'>    public_ip:         "" =&gt; "&lt;computed&gt;"
</span><span class='line'>    security_groups.#: "" =&gt; "&lt;computed&gt;"
</span><span class='line'>    subnet_id:         "" =&gt; "${aws_subnet.public.id}"
</span><span class='line'>    tenancy:           "" =&gt; "&lt;computed&gt;"
</span><span class='line'>
</span><span class='line'>+ module.mesos.aws_instance.master1
</span><span class='line'>    ami:               "" =&gt; "ami-06ef816e"
</span><span class='line'>    availability_zone: "" =&gt; "&lt;computed&gt;"
</span><span class='line'>    instance_type:     "" =&gt; "t2.micro"
</span><span class='line'>    key_name:          "" =&gt; "your key name"
</span><span class='line'>    private_dns:       "" =&gt; "&lt;computed&gt;"
</span><span class='line'>    private_ip:        "" =&gt; "10.0.1.11"
</span><span class='line'>    public_dns:        "" =&gt; "&lt;computed&gt;"
</span><span class='line'>    public_ip:         "" =&gt; "&lt;computed&gt;"
</span><span class='line'>    security_groups.#: "" =&gt; "&lt;computed&gt;"
</span><span class='line'>    subnet_id:         "" =&gt; "${aws_subnet.public.id}"
</span><span class='line'>    tenancy:           "" =&gt; "&lt;computed&gt;"
</span><span class='line'>
</span><span class='line'>+ module.mesos.aws_instance.master2
</span><span class='line'>    ami:               "" =&gt; "ami-06ef816e"
</span><span class='line'>    availability_zone: "" =&gt; "&lt;computed&gt;"
</span><span class='line'>    instance_type:     "" =&gt; "t2.micro"
</span><span class='line'>    key_name:          "" =&gt; "your key name"
</span><span class='line'>    private_dns:       "" =&gt; "&lt;computed&gt;"
</span><span class='line'>    private_ip:        "" =&gt; "10.0.1.12"
</span><span class='line'>    public_dns:        "" =&gt; "&lt;computed&gt;"
</span><span class='line'>    public_ip:         "" =&gt; "&lt;computed&gt;"
</span><span class='line'>    security_groups.#: "" =&gt; "&lt;computed&gt;"
</span><span class='line'>    subnet_id:         "" =&gt; "${aws_subnet.public.id}"
</span><span class='line'>    tenancy:           "" =&gt; "&lt;computed&gt;"
</span><span class='line'>
</span><span class='line'>+ module.mesos.aws_instance.master3
</span><span class='line'>    ami:               "" =&gt; "ami-06ef816e"
</span><span class='line'>    availability_zone: "" =&gt; "&lt;computed&gt;"
</span><span class='line'>    instance_type:     "" =&gt; "t2.micro"
</span><span class='line'>    key_name:          "" =&gt; "your key name"
</span><span class='line'>    private_dns:       "" =&gt; "&lt;computed&gt;"
</span><span class='line'>    private_ip:        "" =&gt; "10.0.1.13"
</span><span class='line'>    public_dns:        "" =&gt; "&lt;computed&gt;"
</span><span class='line'>    public_ip:         "" =&gt; "&lt;computed&gt;"
</span><span class='line'>    security_groups.#: "" =&gt; "&lt;computed&gt;"
</span><span class='line'>    subnet_id:         "" =&gt; "${aws_subnet.public.id}"
</span><span class='line'>    tenancy:           "" =&gt; "&lt;computed&gt;"
</span><span class='line'>
</span><span class='line'>+ module.mesos.aws_instance.slaves.0
</span><span class='line'>    ami:                                  "" =&gt; "ami-06ef816e"
</span><span class='line'>    availability_zone:                    "" =&gt; "&lt;computed&gt;"
</span><span class='line'>    block_device.#:                       "" =&gt; "1"
</span><span class='line'>    block_device.0.delete_on_termination: "" =&gt; "1"
</span><span class='line'>    block_device.0.device_name:           "" =&gt; "/dev/sdb"
</span><span class='line'>    block_device.0.encrypted:             "" =&gt; ""
</span><span class='line'>    block_device.0.snapshot_id:           "" =&gt; ""
</span><span class='line'>    block_device.0.virtual_name:          "" =&gt; ""
</span><span class='line'>    block_device.0.volume_size:           "" =&gt; "30"
</span><span class='line'>    block_device.0.volume_type:           "" =&gt; ""
</span><span class='line'>    instance_type:                        "" =&gt; "t2.micro"
</span><span class='line'>    key_name:                             "" =&gt; "your key name"
</span><span class='line'>    private_dns:                          "" =&gt; "&lt;computed&gt;"
</span><span class='line'>    private_ip:                           "" =&gt; "&lt;computed&gt;"
</span><span class='line'>    public_dns:                           "" =&gt; "&lt;computed&gt;"
</span><span class='line'>    public_ip:                            "" =&gt; "&lt;computed&gt;"
</span><span class='line'>    security_groups.#:                    "" =&gt; "&lt;computed&gt;"
</span><span class='line'>    subnet_id:                            "" =&gt; "${aws_subnet.public.id}"
</span><span class='line'>    tenancy:                              "" =&gt; "&lt;computed&gt;"
</span><span class='line'>
</span><span class='line'>+ module.mesos.aws_instance.slaves.1
</span><span class='line'>    ami:                                  "" =&gt; "ami-06ef816e"
</span><span class='line'>    availability_zone:                    "" =&gt; "&lt;computed&gt;"
</span><span class='line'>    block_device.#:                       "" =&gt; "1"
</span><span class='line'>    block_device.0.delete_on_termination: "" =&gt; "1"
</span><span class='line'>    block_device.0.device_name:           "" =&gt; "/dev/sdb"
</span><span class='line'>    block_device.0.encrypted:             "" =&gt; ""
</span><span class='line'>    block_device.0.snapshot_id:           "" =&gt; ""
</span><span class='line'>    block_device.0.virtual_name:          "" =&gt; ""
</span><span class='line'>    block_device.0.volume_size:           "" =&gt; "30"
</span><span class='line'>    block_device.0.volume_type:           "" =&gt; ""
</span><span class='line'>    instance_type:                        "" =&gt; "t2.micro"
</span><span class='line'>    key_name:                             "" =&gt; "your key name"
</span><span class='line'>    private_dns:                          "" =&gt; "&lt;computed&gt;"
</span><span class='line'>    private_ip:                           "" =&gt; "&lt;computed&gt;"
</span><span class='line'>    public_dns:                           "" =&gt; "&lt;computed&gt;"
</span><span class='line'>    public_ip:                            "" =&gt; "&lt;computed&gt;"
</span><span class='line'>    security_groups.#:                    "" =&gt; "&lt;computed&gt;"
</span><span class='line'>    subnet_id:                            "" =&gt; "${aws_subnet.public.id}"
</span><span class='line'>    tenancy:                              "" =&gt; "&lt;computed&gt;"
</span><span class='line'>
</span><span class='line'>+ module.mesos.aws_instance.slaves.2
</span><span class='line'>    ami:                                  "" =&gt; "ami-06ef816e"
</span><span class='line'>    availability_zone:                    "" =&gt; "&lt;computed&gt;"
</span><span class='line'>    block_device.#:                       "" =&gt; "1"
</span><span class='line'>    block_device.0.delete_on_termination: "" =&gt; "1"
</span><span class='line'>    block_device.0.device_name:           "" =&gt; "/dev/sdb"
</span><span class='line'>    block_device.0.encrypted:             "" =&gt; ""
</span><span class='line'>    block_device.0.snapshot_id:           "" =&gt; ""
</span><span class='line'>    block_device.0.virtual_name:          "" =&gt; ""
</span><span class='line'>    block_device.0.volume_size:           "" =&gt; "30"
</span><span class='line'>    block_device.0.volume_type:           "" =&gt; ""
</span><span class='line'>    instance_type:                        "" =&gt; "t2.micro"
</span><span class='line'>    key_name:                             "" =&gt; "your key name"
</span><span class='line'>    private_dns:                          "" =&gt; "&lt;computed&gt;"
</span><span class='line'>    private_ip:                           "" =&gt; "&lt;computed&gt;"
</span><span class='line'>    public_dns:                           "" =&gt; "&lt;computed&gt;"
</span><span class='line'>    public_ip:                            "" =&gt; "&lt;computed&gt;"
</span><span class='line'>    security_groups.#:                    "" =&gt; "&lt;computed&gt;"
</span><span class='line'>    subnet_id:                            "" =&gt; "${aws_subnet.public.id}"
</span><span class='line'>    tenancy:                              "" =&gt; "&lt;computed&gt;"
</span><span class='line'>
</span><span class='line'>+ module.mesos.aws_internet_gateway.public
</span><span class='line'>    vpc_id: "" =&gt; "${var.vpc_id}"
</span><span class='line'>
</span><span class='line'>+ module.mesos.aws_route_table.public
</span><span class='line'>    route.#:             "" =&gt; "1"
</span><span class='line'>    route.0.cidr_block:  "" =&gt; "0.0.0.0/0"
</span><span class='line'>    route.0.gateway_id:  "" =&gt; "${aws_internet_gateway.public.id}"
</span><span class='line'>    route.0.instance_id: "" =&gt; ""
</span><span class='line'>    vpc_id:              "" =&gt; "${var.vpc_id}"
</span><span class='line'>
</span><span class='line'>+ module.mesos.aws_route_table_association.public
</span><span class='line'>    route_table_id: "" =&gt; "${aws_route_table.public.id}"
</span><span class='line'>    subnet_id:      "" =&gt; "${aws_subnet.public.id}"
</span><span class='line'>
</span><span class='line'>+ module.mesos.aws_security_group.maintenance
</span><span class='line'>    description:                 "" =&gt; "maintenance"
</span><span class='line'>    ingress.#:                   "" =&gt; "1"
</span><span class='line'>    ingress.0.cidr_blocks.#:     "" =&gt; "1"
</span><span class='line'>    ingress.0.cidr_blocks.0:     "" =&gt; "0.0.0.0/0"
</span><span class='line'>    ingress.0.from_port:         "" =&gt; "22"
</span><span class='line'>    ingress.0.protocol:          "" =&gt; "tcp"
</span><span class='line'>    ingress.0.security_groups.#: "" =&gt; "0"
</span><span class='line'>    ingress.0.self:              "" =&gt; "0"
</span><span class='line'>    ingress.0.to_port:           "" =&gt; "22"
</span><span class='line'>    name:                        "" =&gt; "maintenance"
</span><span class='line'>    owner_id:                    "" =&gt; "&lt;computed&gt;"
</span><span class='line'>    vpc_id:                      "" =&gt; "${var.vpc_id}"
</span><span class='line'>
</span><span class='line'>+ module.mesos.aws_security_group.master
</span><span class='line'>    description:                 "" =&gt; "master"
</span><span class='line'>    ingress.#:                   "" =&gt; "2"
</span><span class='line'>    ingress.0.cidr_blocks.#:     "" =&gt; "1"
</span><span class='line'>    ingress.0.cidr_blocks.0:     "" =&gt; "0.0.0.0/0"
</span><span class='line'>    ingress.0.from_port:         "" =&gt; "8080"
</span><span class='line'>    ingress.0.protocol:          "" =&gt; "tcp"
</span><span class='line'>    ingress.0.security_groups.#: "" =&gt; "0"
</span><span class='line'>    ingress.0.self:              "" =&gt; "0"
</span><span class='line'>    ingress.0.to_port:           "" =&gt; "8080"
</span><span class='line'>    ingress.1.cidr_blocks.#:     "" =&gt; "1"
</span><span class='line'>    ingress.1.cidr_blocks.0:     "" =&gt; "0.0.0.0/0"
</span><span class='line'>    ingress.1.from_port:         "" =&gt; "5050"
</span><span class='line'>    ingress.1.protocol:          "" =&gt; "tcp"
</span><span class='line'>    ingress.1.security_groups.#: "" =&gt; "0"
</span><span class='line'>    ingress.1.self:              "" =&gt; "0"
</span><span class='line'>    ingress.1.to_port:           "" =&gt; "5050"
</span><span class='line'>    name:                        "" =&gt; "master"
</span><span class='line'>    owner_id:                    "" =&gt; "&lt;computed&gt;"
</span><span class='line'>    vpc_id:                      "" =&gt; "${var.vpc_id}"
</span><span class='line'>
</span><span class='line'>+ module.mesos.aws_security_group.private
</span><span class='line'>    description:                 "" =&gt; "private"
</span><span class='line'>    ingress.#:                   "" =&gt; "3"
</span><span class='line'>    ingress.0.cidr_blocks.#:     "" =&gt; "0"
</span><span class='line'>    ingress.0.from_port:         "" =&gt; "0"
</span><span class='line'>    ingress.0.protocol:          "" =&gt; "udp"
</span><span class='line'>    ingress.0.security_groups.#: "" =&gt; "0"
</span><span class='line'>    ingress.0.self:              "" =&gt; "1"
</span><span class='line'>    ingress.0.to_port:           "" =&gt; "65535"
</span><span class='line'>    ingress.1.cidr_blocks.#:     "" =&gt; "0"
</span><span class='line'>    ingress.1.from_port:         "" =&gt; "-1"
</span><span class='line'>    ingress.1.protocol:          "" =&gt; "icmp"
</span><span class='line'>    ingress.1.security_groups.#: "" =&gt; "0"
</span><span class='line'>    ingress.1.self:              "" =&gt; "1"
</span><span class='line'>    ingress.1.to_port:           "" =&gt; "-1"
</span><span class='line'>    ingress.2.cidr_blocks.#:     "" =&gt; "0"
</span><span class='line'>    ingress.2.from_port:         "" =&gt; "0"
</span><span class='line'>    ingress.2.protocol:          "" =&gt; "tcp"
</span><span class='line'>    ingress.2.security_groups.#: "" =&gt; "0"
</span><span class='line'>    ingress.2.self:              "" =&gt; "1"
</span><span class='line'>    ingress.2.to_port:           "" =&gt; "65535"
</span><span class='line'>    name:                        "" =&gt; "private"
</span><span class='line'>    owner_id:                    "" =&gt; "&lt;computed&gt;"
</span><span class='line'>    vpc_id:                      "" =&gt; "${var.vpc_id}"
</span><span class='line'>
</span><span class='line'>+ module.mesos.aws_security_group.slave
</span><span class='line'>    description:                 "" =&gt; "slave"
</span><span class='line'>    ingress.#:                   "" =&gt; "1"
</span><span class='line'>    ingress.0.cidr_blocks.#:     "" =&gt; "1"
</span><span class='line'>    ingress.0.cidr_blocks.0:     "" =&gt; "0.0.0.0/0"
</span><span class='line'>    ingress.0.from_port:         "" =&gt; "5051"
</span><span class='line'>    ingress.0.protocol:          "" =&gt; "tcp"
</span><span class='line'>    ingress.0.security_groups.#: "" =&gt; "0"
</span><span class='line'>    ingress.0.self:              "" =&gt; "0"
</span><span class='line'>    ingress.0.to_port:           "" =&gt; "5051"
</span><span class='line'>    name:                        "" =&gt; "slave"
</span><span class='line'>    owner_id:                    "" =&gt; "&lt;computed&gt;"
</span><span class='line'>    vpc_id:                      "" =&gt; "${var.vpc_id}"
</span><span class='line'>
</span><span class='line'>+ module.mesos.aws_subnet.public
</span><span class='line'>    availability_zone:       "" =&gt; "us-east-1e"
</span><span class='line'>    cidr_block:              "" =&gt; "10.0.1.0/24"
</span><span class='line'>    map_public_ip_on_launch: "" =&gt; "1"
</span><span class='line'>    vpc_id:                  "" =&gt; "${var.vpc_id}"
</span><span class='line'>
</span><span class='line'>+ module.mesos.null_resource.init_ceph
</span></code></pre></td></tr></table></div></figure>


<p>Now, you can do <code>terraform apply</code> and look into instances or Mesos/Marathon UI.</p>

<h2>Inside Terraform module</h2>

<p>There are a few techniques to avoid some difficulties in cluster management and more.</p>

<h3>Ceph cluster initialization process</h3>

<p>To start using Ceph cluster and Ceph FS, you have to run some procedures like this:</p>

<ul>
<li>Create <code>ceph.conf</code> for the cluster</li>
<li>Deploy <code>ceph.conf</code> to <code>mon</code> servers, initialize each <code>mon</code> and gather keys generated on each servers</li>
<li>Deploy keys to <code>osd</code> servers and initialize each <code>osd</code></li>
<li>Deploy keys to <code>mds</code> servers and initialize each <code>mds</code></li>
<li>Create data and metadata OSD pool</li>
<li>Create Ceph FS using these pools</li>
<li>Mount Ceph FS pointing <code>mon</code> servers</li>
</ul>


<p>Since they are too complicated and stateful, there is a big problem to manage Ceph cluster by Terraform or others.</p>

<p><code>ceph-deploy</code> is a easy tool for these procedure, so I used it on the admin instance. But how can we run a initial procedure by Terraform?</p>

<p><code>null_resource</code> is the best way. See <a href="https://github.com/riywo/mesos-ceph/blob/17807b073803d92430adcba28b5e784615de2f02/terraform/init_ceph.tf">terraform/init_ceph.tf</a></p>

<p>After spinning up all instances, this resource runs provisioners to initialize Ceph cluster like above. Once created this virtual resource, this procedure won&rsquo;t be executed any more.</p>

<h3>Ceph initializing and provisioning</h3>

<p>Considering initializing process above, there are two types of resource creation; Initializing and provisioning.</p>

<p>Initializing means the completely initial timing. At this time, each instance doesn&rsquo;t need to be provisioned because the cluster initialization process will do everything.</p>

<p>Provisioning, on the other hand, means after the cluster is initialized. For example, when a master/slave/admin instance is terminated, Terraform tries to re-create the instance and this is provisioning. It is a little bit different process than initializing because the cluster already exists.</p>

<p>See <a href="https://github.com/riywo/mesos-ceph/blob/17807b073803d92430adcba28b5e784615de2f02/terraform/scripts/init_master.sh">terraform/scripts/init_master.sh</a>. <code>if ceph_initialized;</code> block is for this problem. So, all instances can be terminated anytime even after a Ceph cluster is initialized. Try terminate a instance and <code>terraform apply</code>!</p>

<h3>SSH gateway and provisioners</h3>

<p>Terraform provisioners assume the instance can be connected by ssh directly. In this module, I don&rsquo;t open ssh port for cluster instances except admin instance, so it is a SSH gateway.</p>

<p>If you configure <code>connection</code> block to the gateway instead of the actual instance, you can use provisioners, but they run on the gateway.</p>

<p>So, I copy AWS key file into the admin instance to be able to login to other instances (there is not a way to use agent forward so far).</p>

<p>For each instance provisioning, I upload script files prefixed by the instance id to prevent overwriting race condition. See <a href="https://github.com/riywo/mesos-ceph/blob/17807b073803d92430adcba28b5e784615de2f02/terraform/master1.tf">terraform/master1.tf</a>. <code>script_path</code> option for <code>connection</code> is undocumented so far, btw.</p>

<h3>Master IP addresses</h3>

<p>I want to fix master IP addresses because they are hardcoded anywhere. I tried Terraform variable as list of IP addresses, but so far it was impossible.</p>

<p>Because of that, I fixed the number of masters and created each <code>aws_instance</code> resource.</p>

<p>When the list variable feature is implemented, I will refactor these configuration.</p>

<h3>Concatenate provisioner scripts</h3>

<p>I use bash script for provisioners and there are a lot of common functions, so I wrote a shared script <a href="https://github.com/riywo/mesos-ceph/blob/17807b073803d92430adcba28b5e784615de2f02/terraform/scripts/header.sh">terraform/scripts/header.sh</a>.</p>

<p>To run each provisioner correctly, this file must be concatenated. Also, an entry point <code>main</code> must be concatenated. So I did like this:</p>

<figure class='code'><div class="highlight"><table><tr><td class="gutter"><pre class="line-numbers"><span class='line-number'>1</span>
<span class='line-number'>2</span>
<span class='line-number'>3</span>
<span class='line-number'>4</span>
<span class='line-number'>5</span>
</pre></td><td class='code'><pre><code class=''><span class='line'>provisioner "remote-exec" {
</span><span class='line'>      inline = [
</span><span class='line'>          "echo main foo bar | cat header.sh init_foo.sh - | bash"
</span><span class='line'>      ]
</span><span class='line'>}</span></code></pre></td></tr></table></div></figure>


<p>I think there are much better ways, though&hellip;</p>

<h2>Isolation between Terraform and Packer</h2>

<p>There is a philosophy:</p>

<ul>
<li>Packer

<ul>
<li>Install file resources from the Internet</li>
</ul>
</li>
<li>Terraform

<ul>
<li>Install only runtime information, like IP address

<ul>
<li>Do not fetch file resources from the Internet</li>
</ul>
</li>
</ul>
</li>
</ul>


<p>So, any <code>apt-get install</code> are done by Packer nor Terraform. This philosophy is like <a href="http://12factor.net/">The Twelve-Factor App</a>.</p>

<h2>BTW, <code>awk</code> is great</h2>

<p>I wanted a way to use the instance id built by Packer in Terraform automatically. I found that Packer has <code>-machine-readable</code> output option and it is CSV format. So, I started to write a processor script:</p>

<ul>
<li>Print the machine readable output as well as normal Packer output</li>
<li>Write <code>ami.tf</code> file using the instance id built just now</li>
</ul>


<p>See <a href="https://github.com/riywo/mesos-ceph/blob/17807b073803d92430adcba28b5e784615de2f02/packer/process">packer/process</a>. This is my first <code>awk</code> executable script. <code>awk</code> was very nice in this case and I could find a lot of <code>awk</code> tips.</p>

<h2>Understanding basystyle</h2>

<p><a href="https://github.com/progrium/bashstyle">progrium/bashstyle</a></p>

<p>To write complex shell script for Packer/Terraform, I read the bashstyle article above. I don&rsquo;t understand all of them, but there are tons of best practice.</p>

<h1>Conclusion</h1>

<p>It was fun!</p>

<p>Hey, wait a moment&hellip; At the beginning, I just wanted to run many applications on Mesos using Docker, for example WordPress, MySQL Galera Cluster, etc. To implement them, I needed a shared file system, so I started to learn about Ceph which I had an eye on before. To deploy the cluster into AWS, I needed some orchestration software, then started to see Terraform, Packer to create AMI&hellip; Too long yak shaving it was ;(</p>

<p>Now, let&rsquo;s start learning about Mesos/Marathon/Docker and many applications!</p>
]]></content>
  </entry>
  
  <entry>
    <title type="html"><![CDATA[Fluentd on Mesos + Docker + Marathon]]></title>
    <link href="http://tech.riywo.com/blog/2013/12/20/fluentd-on-mesos-plus-docker-plus-marathon/"/>
    <updated>2013-12-20T17:13:00+09:00</updated>
    <id>http://tech.riywo.com/blog/2013/12/20/fluentd-on-mesos-plus-docker-plus-marathon</id>
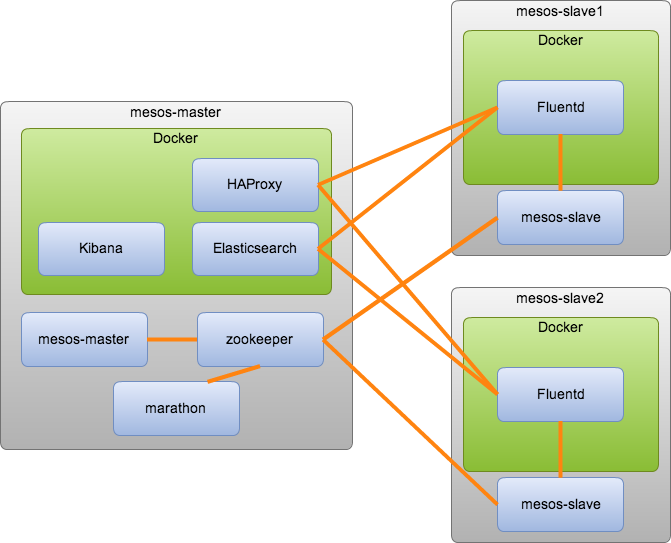
    <content type="html"><![CDATA[<p>I just tried to run Fluentd instances on Mesos + Docker + Marathon in Vagrant boxes. Here is the sample repository.</p>

<ul>
<li><a href="https://github.com/riywo/sample-fluentd-on-mesos-docker">riywo/sample-fluentd-on-mesos-docker</a></li>
</ul>


<p>The overview diagram:</p>

<p><img src="https://cacoo.com/diagrams/9XIEXwoUNUvOOuZ2-AB7C1.png" alt="diagram" /></p>

<!-- more-->


<h2>How?</h2>

<p>See the github README.md.</p>

<h2>What?</h2>

<h3>Fluentd</h3>

<ul>
<li><a href="http://fluentd.org/">Fluentd: Open Source Log Management</a></li>
</ul>


<p>Fluentd is one of log collector middleware. Most web companies in Japan use this for log collecting. td-agent is a package version of fluentd including ruby interpreter.</p>

<p>Some uses want to spin up multiple fluentd workers across many physical servers because fluentd only use one cpu core. Mesos is the right software to manage such situation.</p>

<h3>Mesos</h3>

<ul>
<li><a href="http://mesos.apache.org/">Apache Mesos</a></li>
</ul>


<p>Computer resource management software. You can combine many servers as a one &ldquo;virtual computer&rdquo; with Mesos. Mesos itself is just allocating resources, so you have to use frameworks to manage these resources.</p>

<h3>Marathon</h3>

<ul>
<li><a href="https://github.com/mesosphere/marathon">mesosphere/marathon</a></li>
</ul>


<p>Marathon is a framework on Mesos, which is like &ldquo;upstart for virtual computer&rdquo;. Marathon makes sure the number of running tasks, so if one of Mesos slave goes down, Marathon starts new instances on other slaves.</p>

<p>Marathon also manages port of instances. You can get the list of host:port of your applications just asking Marathon API; this is kind of service discovery.</p>

<h3>Docker</h3>

<ul>
<li><a href="https://www.docker.io/">Homepage - Docker: the Linux container engine</a></li>
</ul>


<p>LXC manager. You don&rsquo;t have to take care of server environment any more. Just create a docker container and commit it. Then, you can run the application anywhere you want. This is very convenient for computer cluster like Mesos.</p>

<p>Mesosphere provides a simple Mesos executor for docker. It runs docker container and bind ports, so you can connect containers from outside of the slave.</p>

<h3>HAProxy</h3>

<ul>
<li><a href="http://haproxy.1wt.eu/">HAProxy - The Reliable, High Performance TCP/HTTP Load Balancer</a></li>
</ul>


<p>Fluentd has http input interface, so I connect them with HAProxy running on Docker. First getting the list of host:port from Marathon, then generating config file of HAProxy. If the list is updated, just restart the HAProxy container.</p>

<h3>Elasticsearch, Kibana</h3>

<ul>
<li><a href="http://www.elasticsearch.org/">Open Source Distributed Real Time Search &amp; Analytics | Elasticsearch</a></li>
<li><a href="http://www.elasticsearch.org/overview/kibana/">Kibana | Overview | Elasticsearch</a></li>
</ul>


<p>Elasticsearch and Kibana is one of the best combination of storing logs and visualizing them.</p>

<p>Fluentd has pluggable input/output and there is Elasticsearch output plugin. I installed it in the fluentd docker image. Giving ES host:port to the container as environment variables, fluentd can connect the ES. I run ES and Kibana on Docker, too.</p>

<h2>Conclusion</h2>

<p>It was very interesting exercise for me. I&rsquo;d like to keep practicing Mesos, Docker, Marathon, Vagrant, whatever. I hope this sample helps you, too.</p>

<p>BTW, there were so much trouble especially Vagrant integration. <code>/etc/hosts</code> file is very tricky. I&rsquo;d like to know more reasonable way to manage Vagrant hosts information…</p>

<h2>References</h2>

<ul>
<li><a href="https://github.com/mesosphere/mesos-docker">mesosphere/mesos-docker</a></li>
<li><a href="http://mesosphere.io/2013/09/26/docker-on-mesos/">Mesosphere · Docker on Mesos</a></li>
<li><a href="http://techcrunch.com/2013/09/26/mesosphere-adds-docker-support-to-its-mesos-based-operating-system-for-the-data-center/">Mesosphere Adds Docker Support To Its Mesos-Based Operating System For The Data Center | TechCrunch</a></li>
<li><a href="http://www.slideshare.net/AishFenton/mesos-docker">Mesos ♥ Docker</a>

<ul>
<li><a href="http://www.youtube.com/watch?v=2MmnggSmTJo">▶ Docker ♥ Mesos - YouTube</a></li>
</ul>
</li>
<li><a href="http://typesafe.com/blog/play-framework-grid-deployment-with-mesos">Play Framework Grid Deployment with Mesos – Blog - Typesafe</a></li>
</ul>

]]></content>
  </entry>
  
  <entry>
    <title type="html"><![CDATA[chown with user's default group]]></title>
    <link href="http://tech.riywo.com/blog/2013/10/11/chown-with-users-default-group/"/>
    <updated>2013-10-11T12:55:00+09:00</updated>
    <id>http://tech.riywo.com/blog/2013/10/11/chown-with-users-default-group</id>
    <content type="html"><![CDATA[<p>You may have used <code>chown</code> command to change the ownership of files or directories like below.</p>

<pre><code>$ ls -l file
-rw-r--r--  1 root root  675 2013-09-23 23:23 file
$ sudo chown foo file
$ ls -l file
-rw-r--r--  1 foo root  675 2013-09-23 23:23 file
</code></pre>

<p>But this is not good because group of <code>file</code> is still <code>root</code>. Most case, you want to set it the default(login) group of the user.</p>

<pre><code>$ id foo
uid=1010(foo) gid=1009(foo) groups=1009(foo)
</code></pre>

<p>In this case, you want to set it <code>foo</code>. For that, I used a command below.</p>

<pre><code>$ chown foo:foo file
$ ls -l file
-rw-r--r--  1 foo foo  675 2013-09-23 23:23 file
</code></pre>

<p>Not bad. But you have to know the default group of the user. It is not always same as the user name.</p>

<!-- more -->


<p>So, here is the best way. Just add <code>:</code> after the user name.</p>

<pre><code>$ sudo chown foo: file
$ ls -l file
-rw-r--r--  1 foo foo  675 2013-09-23 23:23 file
</code></pre>

<p>Wow! This is super easy. See also <code>man chmod</code></p>

<pre><code>… If a colon but no group name follows the user name, that user is made the owner of the files and the group of the files is changed to that user's login group. …
</code></pre>
]]></content>
  </entry>
  
  <entry>
    <title type="html"><![CDATA[mesos tutorial 3]]></title>
    <link href="http://tech.riywo.com/blog/2013/09/29/mesos-tutorial-3/"/>
    <updated>2013-09-29T10:24:00+09:00</updated>
    <id>http://tech.riywo.com/blog/2013/09/29/mesos-tutorial-3</id>
    <content type="html"><![CDATA[<p>To understand development of Mesos Framework, I developed a simple <strong>useless</strong> framework example called <code>msh</code>.</p>

<ul>
<li><a href="https://github.com/riywo/msh">riywo/msh</a></li>
</ul>


<!-- more -->


<h2>Usage</h2>

<p>At first, you should distribute this directory to the all slaves on the same location.</p>

<p>Then, you can run <code>msh</code> command on any server. For example:</p>

<pre><code>$ cat /etc/hosts | ./msh -- cat -n 2&gt;/dev/null
     1  127.0.0.1 localhost
     2
     3  # The following lines are desirable for IPv6 capable hosts
     4  ::1 ip6-localhost ip6-loopback
     5  fe00::0 ip6-localnet
     6  ff00::0 ip6-mcastprefix
     7  ff02::1 ip6-allnodes
     8  ff02::2 ip6-allrouters
     9  ff02::3 ip6-allhosts
</code></pre>

<h2>Internal</h2>

<ul>
<li><code>msh</code> launches a <code>msh-executor</code> using one of resource offers</li>
<li><code>msh-executor</code> starts the given command as a subprocess</li>
<li><code>msh</code> reads its stdin and send the input to the slave as FrameworkMessage</li>
<li><code>msh-executor</code> receives messages and write them to the subprocess.stdin</li>
<li><code>msh-executor</code> reads the subprocess.stdout and sends the output to <code>msh</code> as FrameworkMessage</li>
<li>Each other sends a message &lsquo;EOF&rsquo; as a signal of end of the pipe</li>
<li><code>msh</code> prints received message</li>
</ul>


<h2>TODO</h2>

<ul>
<li>work with no stdin</li>
<li>streaming pipe</li>
<li>pipe multiple tasks like UNIX shell</li>
<li>interactive shell</li>
<li>error handling</li>
</ul>


<h2>Conclusion</h2>

<p>Development of Mesos framework in Python is very easy. I hope this toy project is useful for someone who is interested in Mesos.</p>
]]></content>
  </entry>
  
  <entry>
    <title type="html"><![CDATA[mesos tutorial 2]]></title>
    <link href="http://tech.riywo.com/blog/2013/09/28/mesos-tutorial-2/"/>
    <updated>2013-09-28T00:02:00+09:00</updated>
    <id>http://tech.riywo.com/blog/2013/09/28/mesos-tutorial-2</id>
    <content type="html"><![CDATA[<p>In the pervious post, I tried &ldquo;cpu = 0.1&rdquo; for Mesos tasks. But it didn&rsquo;t work precisely. If you have only one cpu on each slave server, you can run only one task on each slave at the same time even if you specify &ldquo;cpu = 0.1&rdquo; for the tasks.</p>

<p>It only happens on the slave which has just one cpu. If a slave has more than one cpus, it can run tasks more than the number of cpus. I use m1.small and it has only one cpu, unfortunately…</p>

<p>So, I changed Mesosphere&rsquo;s runner script a little to configure <code>--resources</code> flag of <code>mesos-slave</code>.</p>

<pre><code>/usr/bin/mesos-init-wrapper
@@ -22,6 +22,7 @@
   [[ ! ${ULIMIT:-} ]] || ulimit $ULIMIT
   [[ ! ${MASTER:-} ]] || args+=( --master="$MASTER" )
   [[ ! ${LOGS:-} ]]   || args+=( --log_dir="$LOGS" )
+  [[ ! ${RESOURCES:-} ]] || args+=( --resources="$RESOURCES" )
   logged /usr/local/sbin/mesos-slave "${args[@]}"
 }
</code></pre>

<p>And set more cpus.</p>

<pre><code>$ cat /etc/default/mesos-slave
MASTER=`cat /etc/mesos/zk`
RESOURCES="cpus:2"
</code></pre>

<p>Now you can see 2 cpus in your Mesos cluster, then you can run more than 2 tasks on it at the same time.</p>
]]></content>
  </entry>
  
  <entry>
    <title type="html"><![CDATA[mesos introduction 1]]></title>
    <link href="http://tech.riywo.com/blog/2013/09/27/mesos-introduction-1/"/>
    <updated>2013-09-27T00:53:00+09:00</updated>
    <id>http://tech.riywo.com/blog/2013/09/27/mesos-introduction-1</id>
    <content type="html"><![CDATA[<p>Today, Mesosphere released an important milestone. I really desired this integration.</p>

<ul>
<li><a href="http://mesosphere.io/2013/09/26/docker-on-mesos/">Mesosphere · Docker on Mesos</a></li>
</ul>


<p>Now, we can manage our &ldquo;Computers as an OS&rdquo;.</p>

<ul>
<li>Kernel

<ul>
<li><a href="http://mesos.apache.org/">Mesos</a></li>
</ul>
</li>
<li>Process

<ul>
<li><a href="https://www.docker.io/">Docker</a></li>
</ul>
</li>
<li>Init

<ul>
<li><a href="https://github.com/mesosphere/marathon">Marathon</a></li>
</ul>
</li>
<li>Cron

<ul>
<li><a href="https://github.com/airbnb/chronos">Chronos</a></li>
</ul>
</li>
</ul>


<!-- more -->


<p>I would like to learn this new generation &ldquo;OS&rdquo;, so I started to play with Mesos. Mesosphere is a great company and they built packages of Mesos and Marathon. Building Mesos and tools are most painful part of this ecosystem, but now we can super easily start to use Mesos and Marathon. Thanks, Mesosphere:)</p>

<p>I use AWS for Mesos cluster. At first, I created a m1.small instance for a master of Mesos, Zookeeper and Marathon. I use EC2-Classic.</p>

<ul>
<li>AMI

<ul>
<li>Ubuntu Server 13.04</li>
</ul>
</li>
<li>Security Group

<ul>
<li>From any src IP

<ul>
<li>22(ssh)</li>
<li>2181(zk)</li>
<li>5050(mesos master)</li>
<li>5051(mesos slave)</li>
<li>8080(marathon)</li>
</ul>
</li>
</ul>
</li>
</ul>


<p>And I set user-data as an initial setup script:</p>

<pre><code>#!/bin/bash
curl -fL https://raw.github.com/mesosphere/mesos-docker/master/bin/mesos-docker-setup | bash
echo manual &gt;&gt; /etc/init/mesos-slave.conf
reboot
</code></pre>

<p>After the instance is ready, you can access Mesos(5050) and Marathon(8080) from your browser. I associated an EIP to the master.</p>

<p>Then, I requested 10 spot instances for slaves. Same type(m1.small), same AMI, same security group, and user-data:</p>

<pre><code>#!/bin/bash
curl -fL https://raw.github.com/mesosphere/mesos-docker/master/bin/mesos-docker-setup | bash
echo manual &gt;&gt; /etc/init/mesos-master.conf
echo manual &gt;&gt; /etc/init/marathon.conf
echo manual &gt;&gt; /etc/init/zookeeper.conf
echo 'zk://YOUR_MASTER_EIP:2181/mesos' &gt; /etc/mesos/zk
reboot
</code></pre>

<p>After a while, you can see 10 slaves, 10 CPUs and 6GB Mem on your Mesos dashboard! Wow! This is your new &ldquo;OS&rdquo;!</p>

<p>Now you can run ANY process using Mesosphere&rsquo;s Mesos, Marathon and Docker integration. Why don&rsquo;t you request Redis processes to your Marathon?</p>

<pre><code>$ http POST http://YOUR_MASTER_EIP:8080/v1/apps/start \
          id=multidis instances=2 mem=512 cpus=0.5 \
          executor=/var/lib/mesos/executors/docker \
          cmd='johncosta/redis'
</code></pre>

<p>This request will start 2 tasks and use 1 CPU and 1GB Mem. You can scale it very easily. Awesome…, awesome…</p>

<h2>Next step</h2>

<ul>
<li>Build Chronos</li>
<li>Run Chronos on Marathon</li>
<li>Create Docker image and run it on Marathon</li>
<li>Integration with <a href="https://github.com/coreos/etcd">etcd</a>, or something

<ul>
<li>Configuration of 12factor app</li>
</ul>
</li>
<li>Integration with <a href="http://ceph.com/">Ceph</a> or other storage

<ul>
<li>For virtual storage</li>
</ul>
</li>
</ul>

]]></content>
  </entry>
  
  <entry>
    <title type="html"><![CDATA[Private PaaS]]></title>
    <link href="http://tech.riywo.com/blog/2013/09/08/private-paas/"/>
    <updated>2013-09-08T02:24:00+09:00</updated>
    <id>http://tech.riywo.com/blog/2013/09/08/private-paas</id>
    <content type="html"><![CDATA[<p>作りたいなーと漠然と思ってるアイデア。自分用メモなので色々省略してますので、興味ある人がいれば詳しく話します。</p>

<ul>
<li>基本コンセプト

<ul>
<li>Herokuライクなデプロイ</li>
<li>壊れにくい</li>
<li>開発が運用コスト管理</li>
</ul>
</li>
<li>技術トピック

<ul>
<li>12factor</li>
<li>Docker</li>
<li>Mesos</li>
</ul>
</li>
</ul>


<!-- more -->


<h2>基本コンセプト</h2>

<p>よくある話で、開発者が自由にサーバを足し引きできたら楽だよね、という発想をもうちょっと現実的に意味のあるものにしてみた。単にgit pushでアプリ起動、くらいだったらdokkuとかDeisとか使えばなんもせんでもできる。けどそれだけだと、じゃあそのサーバの面倒は？とかリソースの割り当ては？とか、本質的に面倒な問題は片付かない。</p>

<p>ので、自由に計算機資源を使える代わりに、使う分のお金は自分で払ってね、というアイデアを考えた。普通にPaaS使うなら当たり前なんだけど、社内とかになると、余ってるサーバ使おう、共有部門の負担で、運用は誰かよろしく、みたいな感じになりがち。そうじゃなくて、自分達が使う分をちゃんとお金負担して使えば、チューニングも自分達でやらなきゃって思うし、コスト感覚が強くなると思う。</p>

<p>開発と運用を分けることで、確実に開発スピードは落ちる。落ちるから安定するとも言える。開発スピードを落とさず、お金かければある程度はスケールさせて逃げられるような共通基盤、あったらいいなぁ、ということで考えた結果、インフラ屋さんほとんど要らない感じにしたいなと思った。</p>

<h3>Herokuライクなデプロイ</h3>

<p>まぁこれは言うまでもなく。upstartとかdaemontoolsのrunスクリプトなんて、毎度書くのはDRYじゃない。デプロイしてアプリ起動までは共通的に自動化すべき。そうでなきゃ、結局サーバの管理コストが果てしなくなる。</p>

<h3>壊れにくい</h3>

<p>環境の構築が必要な時点で、壊れる可能性が非常に上がる。各種パッケージマネージャでバージョン固定しないと、とか。だったら、Dockerで稼働環境を丸っと固めて置くのがよい。デプロイもimageをダウンロードして起動するだけでシンプル。</p>

<h3>開発が運用コスト管理</h3>

<p>キャパシティプランニングも開発チームがやろう。でも、例えば開発チームが複数のサービスを1つのサーバクラスタで動かしたいとしたら、プランニングがとても面倒。だからといって、1サービス1クラスタとかにすると無駄が多くなりそう。Mesos使ってリソース管理すると、一段抽象化できるので計算しやすそうだし、足し引き簡単そう。</p>

<h2>技術トピック</h2>

<h3>12factor</h3>

<p>そもそもアプリの作りが12factor的な感じになってないと色々やりづらそう。特にconfigはオレオレにあのファイルやこのファイル読んで、とかなじゃくて、全部環境変数にしてしまう。</p>

<h3>Docker</h3>

<p>Docker imageはサービスごとに違っても、なんか共通の使っても、どっちでもいい。いつ誰がどこで起動しても同じ環境になるのがうれしい。その環境自体の記述はDockerfileで工夫する感じかな。ソースコードはbind mountすれば良さそう。</p>

<p>これやると開発環境と本番環境の差異が無くなるので多分うれしい人が多い。他には、新入社員の環境構築も一瞬、CIとかも環境構築に時間使わない、最初はEC2で大きくなったらオンプレでというのが超簡単、などなど。</p>

<p>デプロイはアプリケーションのリビジョンとそれが使うDocker imageのリビジョンをセットにする。ローカルのファイルシステムは使ってもいいけど、いつか消えるのでそういう用途に使わない(Herokuと同じ)。</p>

<p>もう一つ利点は、人気無くなったサービスとかを引き取る人が、何も調べずとも環境作れるので、とりあえず何の更新もせずに動かしておくだけのサービスの障害とかに時間使うことがほとんど無くなる。</p>

<h3>Mesos</h3>

<p>チームとかの単位でMesosクラスタ持つ。そのクラスタの料金を負担する。高負荷やバグをクラスタ増強でしのぎたければお金を積むか他から借りる。インフラ屋さんは全社のMesosクラスタ用のサーバの余剰を管理するだけでよし（ネットワーク資源除く）。開発側はMesosクラスタさえ持ってれば、あとはその資源の尽きない限りにおいて、自由に計算機資源を使えるので、インフラ屋さんにお伺いをたてる必要なくなる。EC2使うなら何も気にする必要ない、お金さえあれば。</p>

<p>動きはMesosがDockerを起動する感じMesosphereの人がそういうの作るって言ってたので待ってる。Marathon使えばdaemonも管理できそう。Chronos使えばcron駆逐できそう。</p>

<p>あとインフラ屋さんもDocker使って好きな監視エージェントとかをばらまける。こちらもイチイチ開発側にお伺いたてる必要ないので楽。共通的に使えるツールの開発と適応の速度上げられそう。</p>

<h2>課題</h2>

<p>データベースは要検討。Mesosにしてもいいのかもしれないし、そこはRDSとかみたいな外部サービスを使うかインフラ屋さんが同じようなインタフェースを作って責任持つのがいいのかもしれない。</p>

<p>ログ収集や監視は共通的に同じの入れてもいいかもだけど、そうすると今度はそれの更新スピードが落ちるので、Mesosで簡単に入れられるような基盤整備するだけがいいのかも。面倒くさがりは用意されたまま使えばいいし、手を入れたければ自分のところで勝手に変えてしまえばいい。</p>

<p>チューニングとかをインフラ屋さんが担ってたとしたら、そういう人を各サービスで抱えるか、もしくはそういう専門部隊として再編成すると良さそう。ナレッジとライブラリ・ツールの共有ができるようにすることが大事。</p>

<h2>まとめ</h2>

<p>お金で解決できるところはお金で解決して、なるべく時間の無駄を無くして開発スピードを上げるにはどうしたらいいかなということで考えた結果、開発側が運用コスト負担すればいいのではという結論になった。どうしても運用コストだけを見てる人と開発スピードだけを見てる人の価値観は合わないので、同じ人がやるべきかなと。</p>

<p>ただ、これやるぐらいなら各チームが勝手にHeroku使えばいいのでは？という気もするので、実装する気力は全然起きてない。誰かが作ってくれるのを待ってる。</p>
]]></content>
  </entry>
  
  <entry>
    <title type="html"><![CDATA[my github trends 2013-09-05]]></title>
    <link href="http://tech.riywo.com/blog/2013/09/05/my-github-trends-2013-09-05/"/>
    <updated>2013-09-05T21:18:00+09:00</updated>
    <id>http://tech.riywo.com/blog/2013/09/05/my-github-trends-2013-09-05</id>
    <content type="html"><![CDATA[<h2><a href="https://github.com/maiha/typed">maiha/typed</a></h2>

<p>Typed variable for ruby!</p>

<h2><a href="https://github.com/Sirupsen/posix-mqueue">Sirupsen/posix-mqueue</a> &amp; <a href="https://github.com/Sirupsen/localjob">Sirupsen/localjob</a></h2>

<p>Local host message queue using POSIX mqueue and delayed job. You don&rsquo;t have to run any daemon for queue store!</p>

<h2><a href="https://github.com/ddollar/forego">ddollar/forego</a></h2>

<p><code>foreman</code> written in Go! ddollar is an original author of <code>foreman</code>, so this is a real descendant of <code>foreman</code>.</p>

<h2><a href="https://github.com/d2fn/gopack">d2fn/gopack</a></h2>

<p>We can manage go libraries source and version using a simple config file like Bundler.</p>

<h2><a href="https://github.com/rogerwang/node-webkit">rogerwang/node-webkit</a></h2>

<p>We can write an desktop application using HTML5, CSS, JS and WebGL!</p>

<h2><a href="https://github.com/paralect/robomongo">paralect/robomongo</a></h2>

<p>MongoDB management GUI application. Beautiful…</p>

<hr />

<p>Today&rsquo;s my best: node-webkit</p>

<p>Love github!</p>
]]></content>
  </entry>
  
  <entry>
    <title type="html"><![CDATA[My Github Trends 2013-09-04]]></title>
    <link href="http://tech.riywo.com/blog/2013/09/04/my-github-trends-2013-09-04/"/>
    <updated>2013-09-04T22:19:00+09:00</updated>
    <id>http://tech.riywo.com/blog/2013/09/04/my-github-trends-2013-09-04</id>
    <content type="html"><![CDATA[<p>I love github. I introduce some github repositories from Today&rsquo;s trends or my recent starred. I will continuously post Github Trends every day hopefully…</p>

<p>I read only README, so my impression must be useless, but I hope it will be a chance  for readers to know awesome github repositories.</p>

<!-- more -->


<h2><a href="https://github.com/nferraz/st">nferraz/st</a></h2>

<p>This is a super simple CLI tool for statistics written in Perl. We, no more need awk, perl, ruby, python or any annoying one-liner.</p>

<h2><a href="https://github.com/RichiH/vcsh">RichiH/vcsh</a></h2>

<p>Most people upload their dotfiles into github. They must use this tool. You can manage your dotfiles and home directory using separate git repositories. Awesome.</p>

<h2><a href="https://github.com/zunda/emoticommits">zunda/emoticommits</a></h2>

<p>github commit with emoticon is cheerful work. The example map application is super cool!</p>

<h2><a href="https://github.com/FredrikNoren/ungit">FredrikNoren/ungit</a></h2>

<p>Excellent… The best local git repository management application. I usually use <code>tig</code>, but I will try this super awesome tool.</p>

<hr />

<p>See ya!</p>
]]></content>
  </entry>
  
  <entry>
    <title type="html"><![CDATA[omniauth-openid with pow and nginx SSL termination]]></title>
    <link href="http://tech.riywo.com/blog/2013/08/24/omniauth-openid-with-pow-and-nginx-ssl-termination/"/>
    <updated>2013-08-24T16:14:00+09:00</updated>
    <id>http://tech.riywo.com/blog/2013/08/24/omniauth-openid-with-pow-and-nginx-ssl-termination</id>
    <content type="html"><![CDATA[<p>I tried to use <code>omniauth-openid</code> with my new rails application. It worked when I developed using HTTP. After I started to develop with HTTPS, it failed. Finally I got the coolest workaround: <code>OmniAuth.config.full_host</code> and <code>X-Forwarded-Host/Port</code>.</p>

<!-- more -->


<h2>My Environment</h2>

<p>I use <code>Pow</code> for a development server. To use HTTPS with <code>Pow</code>, I installed <code>nginx</code> and configured like below.</p>

<pre><code>server {
    listen     443;
    server_name  *.dev *.xip.io;

    ssl               on;
    ssl_certificate   ssl/my.crt;
    ssl_certificate_key  ssl/my.key;

    ssl_session_timeout  5m;

    ssl_protocols  SSLv2 SSLv3 TLSv1;
    ssl_ciphers  HIGH:!aNULL:!MD5;
    ssl_prefer_server_ciphers   on;

    location / {
      proxy_set_header Host $host;
      proxy_set_header X-Real-IP $remote_addr;
      proxy_set_header X-Forwarded-For $proxy_add_x_forwarded_for;
      proxy_set_header X-Forwarded-Proto https;
      proxy_redirect off;
      proxy_pass http://127.0.0.1;
      proxy_next_upstream error timeout invalid_header http_500 http_502 http_503;
    }
}
</code></pre>

<p>For authentication, I use <code>omniauth-openid</code> via <code>omniauth-google-apps</code> and <code>devise</code>.</p>

<h3>config/initializers/devise.rb</h3>

<pre><code>config.omniauth :google_apps, store: OpenID::Store::Filesystem.new('/tmp'), domain: ENV['GOOGLE_APPS_DOMAIN']
</code></pre>

<h3>app/controllers/users/omniauth_callbacks_controller.rb</h3>

<pre><code>class Users::OmniauthCallbacksController &lt; Devise::OmniauthCallbacksController
  skip_before_action :verify_authenticity_token

  def google_apps
      …
</code></pre>

<p>They worked if I access to <code>Pow</code> directly using HTTP.</p>

<h2>What was the problem 1?</h2>

<p>I guess all people using <code>omniauth-oauth2</code> behind a reverse proxy encounter &ldquo;Redirect uri mismatch&rdquo; error. Because <code>redirect_uri</code> query string parameter is like <code>https://myapp.127.0.0.1.xip.io:80/users/auth/github</code>. <code>:80</code> ?????</p>

<p>And <code>omniauth-google-apps</code> didn&rsquo;t work neither. My browser tried to redirect to <code>https://myapp.127.0.0.1.xip.io:80/users/auth/google_apps/callback</code>…</p>

<h3>Solution</h3>

<p>Here is a simple workaround for this.</p>

<ul>
<li><a href="http://www.kbedell.com/2011/03/08/overriding-omniauth-callback-url-for-twitter-or-facebook-oath-processing/">Overriding the OmniAuth callback url for twitter or facebook oath processing. | Kevin Bedell on Internet Tech</a></li>
</ul>


<p>To simplify, I configured it as a string.</p>

<pre><code>OmniAuth.config.full_host = "https://myapp.127.0.0.1.xip.io"
</code></pre>

<h2>What was the problem 2?</h2>

<p>After that, when I accessed to <code>https://myapp.127.0.0.1.xip.io/users/auth/google_apps</code>, Google said:</p>

<pre><code>Error: invalid_request
Error in parsing the OpenID auth request.
</code></pre>

<p>The reason was a request query string parameter:</p>

<pre><code>openid.realm:https://myapp.127.0.0.1.xip.io:80
</code></pre>

<p><code>:80</code> again… At this time, it came from <code>rack-openid</code> via <code>omniauth-openid</code>.</p>

<p><a href="https://github.com/josh/rack-openid/blob/v1.3.1/lib/rack/openid.rb#L127">rack-openid/lib/rack/openid.rb at v1.3.1 · josh/rack-openid</a></p>

<pre><code> oidreq.redirect_url(trust_root || realm_url(req), return_to || request_url, immediate)
</code></pre>

<p>At first, I applied a monkey patch to <code>omniauth-openid</code>:</p>

<pre><code>--- a/lib/omniauth/strategies/open_id.rb
+++ b/lib/omniauth/strategies/open_id.rb
@@ -32,6 +32,7 @@ module OmniAuth
         lambda{|env| [401, {"WWW-Authenticate" =&gt; Rack::OpenID.build_header(
           :identifier =&gt; identifier,
           :return_to =&gt; callback_url,
+         :trust_root =&gt; full_host,
           :required =&gt; options.required,
           :optional =&gt; options.optional,
           :method =&gt; 'post'
</code></pre>

<p>Then, <code>opened.realm</code> looked fine, but after the callback, OmniAuth said:</p>

<pre><code>Could not authenticate you from GoogleApps because "Invalid credentials".
</code></pre>

<p>This was because <code>rack-openid</code> doesn&rsquo;t pay attention to <code>trust_root</code>.</p>

<p><a href="https://github.com/josh/rack-openid/blob/v1.3.1/lib/rack/openid.rb#L145">rack-openid/lib/rack/openid.rb at v1.3.1 · josh/rack-openid</a></p>

<pre><code>consumer.complete(flatten_params(req.params), req.url)
</code></pre>

<p>Then, I found another monkey patch for <code>Rack::Request</code>.</p>

<ul>
<li><a href="http://stackoverflow.com/questions/4051577/openid-for-rails-app-behind-apache/4331679#4331679">mod rewrite - OpenID for rails app behind Apache - Stack Overflow</a></li>
</ul>


<p>But this is not cool. I thought that <code>Rack::Request</code> must have a functionality to deal with HTTPS reverse proxy.</p>

<p><a href="https://github.com/rack/rack/blob/1.5.2/lib/rack/request.rb#L96">rack/lib/rack/request.rb at 1.5.2 · rack/rack</a></p>

<pre><code>def port
  if port = host_with_port.split(/:/)[1]
    port.to_i
  elsif port = @env['HTTP_X_FORWARDED_PORT']
    port.to_i
  elsif @env.has_key?("HTTP_X_FORWARDED_HOST")
    DEFAULT_PORTS[scheme]
  else
    @env["SERVER_PORT"].to_i
  end
end
</code></pre>

<p>YES!!!!!!!!!!!!!!!</p>

<h3>Solution</h3>

<p>I added <code>X-Forwarded-Host</code> on my <code>nginx.conf</code>, then it worked! Because I had already configured <code>X-Forwarded-Proto</code>.</p>

<pre><code>proxy_set_header X-Forwarded-Host $host;
</code></pre>

<p>Or <code>X-Forwarded-Port</code> also worked.</p>

<pre><code>proxy_set_header X-Forwarded-Port 443;
</code></pre>

<h2>Conclusion</h2>

<p>If you use SSL termination(nginx, Apache, LB, etc.) with your application:</p>

<ul>
<li>You should use SSL termination for your development environment.

<ul>
<li>Otherwise, you will have some trouble between dev and prod…</li>
</ul>
</li>
<li>You should pass much information using <code>X-Forwarded-*</code> headers.

<ul>
<li>Many libraries handle these headers better than you:)</li>
</ul>
</li>
</ul>

]]></content>
  </entry>
  
  <entry>
    <title type="html"><![CDATA[Using columns of a intermediate table with ActiveRecord has_many association]]></title>
    <link href="http://tech.riywo.com/blog/2013/06/22/using-columns-of-a-intermediate-table-with-activerecord-has-many-association/"/>
    <updated>2013-06-22T09:51:00+09:00</updated>
    <id>http://tech.riywo.com/blog/2013/06/22/using-columns-of-a-intermediate-table-with-activerecord-has-many-association</id>
    <content type="html"><![CDATA[<p>I have n:m relation tables and want to use columns of the intermediate table.</p>

<pre><code>activerecord (4.0.0.rc2)

class User &lt; ActiveRecord::Base
  has_many :user_bookmarks
  has_many :bookmarks, through: :user_bookmarks
end

class UserBookmark &lt; ActiveRecord::Base
  belongs_to :user
  belongs_to :bookmark
  # has column "star"
end

class Bookmark &lt; ActiveRecord::Base
  has_many :user_bookmarks
  has_many :users, through: :user_bookmarks
end

&gt; User.first.bookmarks.first.star
NoMethodError: undefined method `star' for #&lt;Bookmark:0x007ff40e45a7b8&gt;
</code></pre>

<!-- more -->


<p>I used a scope block for <code>has_many</code>.</p>

<pre><code>class User &lt; ActiveRecord::Base
  has_many :user_bookmarks
  has_many :bookmarks, -&gt; { select("bookmarks.*, user_bookmarks.star") }, through: :user_bookmarks
end

&gt; User.first.bookmarks.first.star
10
</code></pre>

<p>I&rsquo;m not sure whether this is the best way for the purpose, but it works.</p>
]]></content>
  </entry>
  
  <entry>
    <title type="html"><![CDATA[ruby-build --enable-load-relative]]></title>
    <link href="http://tech.riywo.com/blog/2013/06/22/ruby-build-enable-load-relative/"/>
    <updated>2013-06-22T09:27:00+09:00</updated>
    <id>http://tech.riywo.com/blog/2013/06/22/ruby-build-enable-load-relative</id>
    <content type="html"><![CDATA[<p>CRuby builds a ruby binary and scripts with the absolute path hard corded.</p>

<pre><code>$ strings /Users/riywo/.rbenv/versions/1.9.3-p327/bin/ruby | grep rbenv
/Users/riywo/.rbenv/versions/1.9.3-p327
/Users/riywo/.rbenv/versions/1.9.3-p327/lib/ruby/site_ruby/1.9.1
/Users/riywo/.rbenv/versions/1.9.3-p327/lib/ruby/site_ruby/1.9.1/x86_64-darwin12.2.0
/Users/riywo/.rbenv/versions/1.9.3-p327/lib/ruby/site_ruby
/Users/riywo/.rbenv/versions/1.9.3-p327/lib/ruby/vendor_ruby/1.9.1
/Users/riywo/.rbenv/versions/1.9.3-p327/lib/ruby/vendor_ruby/1.9.1/x86_64-darwin12.2.0
/Users/riywo/.rbenv/versions/1.9.3-p327/lib/ruby/vendor_ruby
/Users/riywo/.rbenv/versions/1.9.3-p327/lib/ruby/1.9.1
/Users/riywo/.rbenv/versions/1.9.3-p327/lib/ruby/1.9.1/x86_64-darwin12.2.0

$ head -1  /Users/riywo/.rbenv/versions/1.9.3-p327/bin/gem
#!/Users/riywo/.rbenv/versions/1.9.3-p327/bin/ruby 
</code></pre>

<!-- more -->


<p>So, if you move the installed directory location, the ruby and scripts don&rsquo;t work. To avoid this kind of problems, you can use <code>--enable-load-relative</code> configure option.</p>

<pre><code>$ RUBY_CONFIGURE_OPTS="--enable-load-relative" rbenv install 1.9.3-p327

$ strings /Users/riywo/.rbenv/versions/1.9.3-p327/bin/ruby | grep rbenv

$ head -8 /Users/riywo/.rbenv/versions/1.9.3-p327/bin/gem
#!/bin/sh
# -*- ruby -*-
bindir=`cd -P "${0%/*}" 2&gt;/dev/null; pwd`
prefix="${bindir%/bin}"
export DYLD_LIBRARY_PATH="$prefix/lib${DYLD_LIBRARY_PATH:+:$DYLD_LIBRARY_PATH}"
exec "$bindir/ruby" -x "$0" "$@"
#!/usr/bin/env ruby
#--
</code></pre>

<p>See also <a href="http://yehudakatz.com/2012/06/05/tokaido-status-update-implementation-details/">Tokaido Status Update: Implementation Details « Katz Got Your Tongue?</a></p>
]]></content>
  </entry>
  
  <entry>
    <title type="html"><![CDATA[git rollback]]></title>
    <link href="http://tech.riywo.com/blog/2013/06/18/git-rollback/"/>
    <updated>2013-06-18T17:20:00+09:00</updated>
    <id>http://tech.riywo.com/blog/2013/06/18/git-rollback</id>
    <content type="html"><![CDATA[<p>One day, I wanted to rollback git repository to a previous commit with a new &ldquo;rollback&rdquo; commit because the wrong commits had already pushed to the master.</p>

<!-- more -->


<h3>MODIFIED: The best way is <code>git revert -n INITHASH..HEAD</code>!</h3>

<p>Thanks, @miyagawa!</p>

<pre><code>$ git init
$ echo important &gt; important
$ touch important_empty
$ git add .
$ git commit -m 'init'
$ ls
important       important_empty

$ git rm important important_empty
$ echo wrong &gt; wrong
$ touch wrong_empty
$ git add .
$ git commit -m 'wrong' ## WRONG COMMIT!
$ ls
wrong       wrong_empty

$ git revert -n INITHASH..HEAD
# On branch master
# Changes to be committed:
#   (use "git reset HEAD &lt;file&gt;..." to unstage)
#
#   new file:   important
#   renamed:    wrong_empty -&gt; important_empty
#   deleted:    wrong
#
$ ls
important       important_empty
</code></pre>

<hr />

<h3>old posts</h3>

<p><del>Generally, <code>git revert -n HASH</code> works, however, if some files are added or deleted, it doesn&rsquo;t work well. Here is an example.</del></p>

<p><code>git revert</code> is not the way to revert &ldquo;to HASH&rdquo;, but to revert &ldquo;HASH&rdquo;.</p>

<pre><code>$ git revert -n INITHASH  ## want to rollback to INITHASH
$ git status
# On branch master
nothing to commit, working directory clean
$ ls
wrong       wrong_empty
</code></pre>

<p>So, I tried some ways. First, <code>git checkout INITHASN .</code>. It worked only for deleted files.</p>

<pre><code>$ git checkout INITHASH .
$ git status
# On branch master
# Changes to be committed:
#   (use "git reset HEAD &lt;file&gt;..." to unstage)
#
#   new file:   important
#   new file:   important_empty
#
$ ls
important       important_empty wrong           wrong_empty
</code></pre>

<p>Second, <code>git checkout -b rollback INITHASH</code> and <code>git merge</code>. Unfortunately, <code>INITHASH</code> had already merged, so it happened nothing.</p>

<pre><code>$ git checkout -b rollback INITHASH
$ ls
important       important_empty
$ git checkout master
$ git merge rollback
Already up-to-date.
</code></pre>

<p>Third, <code>git diff</code> and <code>patch</code>. It affected only non-empty files because <code>git diff</code> output for empty files was not good for <code>patch</code> command.</p>

<pre><code>$ git diff HEAD..INITHASH | patch -p1
patching file important
patching file wrong
$ git status
# On branch master
# Changes not staged for commit:
#   (use "git add/rm &lt;file&gt;..." to update what will be committed)
#   (use "git checkout -- &lt;file&gt;..." to discard changes in working directory)
#
#   deleted:    wrong
#
# Untracked files:
#   (use "git add &lt;file&gt;..." to include in what will be committed)
#
#   important
no changes added to commit (use "git add" and/or "git commit -a")
$ ls
important   wrong_empty
</code></pre>

<p>Finally, I found the best way, that is <code>git apply</code>.</p>

<pre><code>$ git diff HEAD..INITHASH &gt; /tmp/patch
$ git apply /tmp/patch
$ git status
# On branch master
# Changes not staged for commit:
#   (use "git add/rm &lt;file&gt;..." to update what will be committed)
#   (use "git checkout -- &lt;file&gt;..." to discard changes in working directory)
#
#   deleted:    wrong
#   deleted:    wrong_empty
#
# Untracked files:
#   (use "git add &lt;file&gt;..." to include in what will be committed)
#
#   important
#   important_empty
no changes added to commit (use "git add" and/or "git commit -a")
$ ls
important       important_empty
</code></pre>

<p>Hey, git experts, is this the best way to create a new &ldquo;rollback&rdquo; commit?</p>
]]></content>
  </entry>
  
  <entry>
    <title type="html"><![CDATA[anyenv]]></title>
    <link href="http://tech.riywo.com/blog/2013/06/11/anyenv/"/>
    <updated>2013-06-11T00:23:00+09:00</updated>
    <id>http://tech.riywo.com/blog/2013/06/11/anyenv</id>
    <content type="html"><![CDATA[<p>I developed a experimental simple wrapper for <a href="https://github.com/sstephenson/rbenv">rbenv</a>-style version managers.</p>

<ul>
<li><a href="https://github.com/riywo/anyenv">riywo/anyenv</a></li>
</ul>


<!-- more -->


<p>If you add only two lines below in your shell profile, you can use any **env.</p>

<pre><code>export PATH="$HOME/.anyenv/bin:$PATH"
eval "$(anyenv init -)"
</code></pre>

<p><code>anyenv</code> recognizes <code>$ANYENV_ROOT/envs/*</code> as rbenv-style version managers, so <code>anyenv init -</code> outputs <code>export **ENV_ROOT=$ANYENV_ROOT/envs/**env</code>, <code>**env init -</code> and adds <code>$ANYENV_ROOT/envs/**env/bin</code> to <code>$PATH</code>.</p>

<p>Enjoy!</p>

<hr />

<p>rbenvっぽい感じのが結構増えてきて、その度にprofileに足すのがだるいなぁと思ったので、やっつけで<code>anyenv</code>というのを作ってみました。</p>

<ul>
<li><a href="https://github.com/riywo/anyenv">riywo/anyenv</a></li>
</ul>


<p><code>git clone</code>して、以下２行を足せば、<code>~/.anyenv/envs/**env</code>が自動で使えるようになります。</p>

<pre><code>export PATH="$HOME/.anyenv/bin:$PATH"
eval "$(anyenv init -)"
</code></pre>

<p>ご意見募集中。</p>
]]></content>
  </entry>
  
  <entry>
    <title type="html"><![CDATA[provisioning itself]]></title>
    <link href="http://tech.riywo.com/blog/2013/05/13/provisioning-itself/"/>
    <updated>2013-05-13T19:15:00+09:00</updated>
    <id>http://tech.riywo.com/blog/2013/05/13/provisioning-itself</id>
    <content type="html"><![CDATA[<p>これ読んで思ったこと。</p>

<ul>
<li><a href="http://d.hatena.ne.jp/mizchi/20130512/1368351397">プログラミングはそれ自体が目的であっていい - mizchi log</a></li>
</ul>


<p>全く同じ所感を、昨今のserver provisioningブームやクラウド万歳を見てて思う。</p>

<!-- more -->


<h2>「動けばいい」サーバ構築</h2>

<p>programmingそれ自体は歴史が積み上げられていて、「動けばいい」が悪であることやそれを如何にして回避するかということについて、偏執的な人達の惜しみない努力が費やされた結果、次のステージへ移っていっているような気がする。(僕はコード書いたことないのであくまで外野の推測)</p>

<p>一方、provisioning(サーバを構築する)とかその他operationにまつわる物事はその昔programmingが通ってきた道をやっと歩み始めたところ。例えばprovisioningにおいて「動けばいい」は手で対話式に構築されたサーバみたいなもの。手順書すらなかったりして、bashのhistoryと現状の状態をつぶさに観察して同じ状況を作るにはどうすればいいかを解析したことあるけど、リバースエンジニアリングっぽくて後から任された人には全然生産的じゃない。けど、それはそれで地雷を踏みまくるトレーニングになって、実際僕もそういうのをたくさん経験して全部今役に立ってる。</p>

<h2>偏執的な貢献</h2>

<p>ChefとかPuppetはそういうのを一歩先にすすめてくれるツールで、まず正しい状態はなんだったでしょう？から入ってサーバの状態を定義して、それに持っていく部分をいい感じにヘルプしてくれる。けどまだ完璧じゃない。当然だ、まだまだ「provisioningだけ」を目的にしている偏執的な人達の貢献が足りない。</p>

<p>CやJavaだけがプログラミング言語ではないのと同様に、provisioning一つ取ったってやり方は無限にある。僕は<a href="https://speakerdeck.com/riywo/ops-tool-made-by-perl-beginner-number-yapcasia-2012">Touryo</a>というツールを作って一つの方式を実現したし、それは今では<a href="http://serverspec.org/">serverspec</a>とprovisioningツールの組み合わせで実現できるなぁと思ってる。（ホントはもっと色々必要だけど割愛）</p>

<p>別に「インフラがコードになる」とかそういうのはどうでもいいプロパガンダで、本質的に僕が大事にしたいと思ってるのは、一部の言語マニアの様に偏執的に「運用」に取り組める人がどれだけ出てくるのかというところ。僕は多分偏執的な考えだけは持ってて実装力が無い人なので、思いついたアイデア(<a href="https://github.com/riywo/ruby-llenv">llenv</a>とか<a href="https://github.com/riywo/myroku-cookbooks">myroku</a>とか<a href="https://github.com/riywo/pandler">pandler</a>とか)をひーこらしながら実装してそこで力尽きてるけど、これからもっと才能あふれる人達がやってくることを期待してて、彼らのためになんかできないかなーと日々悶々としてる。</p>

<p>まだまだこの分野、学術的な研究も実践的な積み上げも足りてないと思う(学術分野は未調査なので誰か補足が欲しい)。なので「ウェブオペレーション」にもあった様に、徒弟制度の様な形がありふれてしまっている様に思う。が、致し方ないことであり、これから体系化されて行ったり、これまで想像もつかなかったようなパラダイムが出現したりするのが本当に楽しみだ。多分すでに企業の中とか組織の中とかには色々存在するんだろうけど、教科書的にまとまってるのは無いように思う。</p>

<h2>おわりに</h2>

<p>「サーバ構築なんて一度やったらあとはやらなくていいじゃん」とか「なんでパッケージ一つ入れるだけなのに/スクリプト一つ撒くだけなのにこんなにめんどくさいことするの？」とか思ってる人は、自分が「動けばいい」と思っているんだと認識した方がいいと思う。それはいつなんどきも悪ということではないけど、先のエントリにあるように悪となる場面も確実に存在する。そして昨今そういう状況が増えているからこそ、provisioningブームが存在するんだと思う。書けなかったけど、クラウドブームも僕には同じように映ってる。</p>

<p>というわけで、アナロジーを全開にするならmizchiさんの「糞コードを一箇所に押し込める」リファクタリングはprovisioningにも応用できそうだなーと思ったところでこれを書いた。</p>
]]></content>
  </entry>
  
  <entry>
    <title type="html"><![CDATA[fcache - file cache for parallel processes]]></title>
    <link href="http://tech.riywo.com/blog/2013/05/10/fcache-file-cache-for-parallel-processes/"/>
    <updated>2013-05-10T01:46:00+09:00</updated>
    <id>http://tech.riywo.com/blog/2013/05/10/fcache-file-cache-for-parallel-processes</id>
    <content type="html"><![CDATA[<p>以前からたまーにこういうのがあるとうれしいケースがあるなぁと思ってたので作りました。</p>

<ul>
<li><a href="https://github.com/riywo/fcache">riywo/fcache · GitHub</a></li>
</ul>


<p>どういうものかというと、こういう感じで何かstdoutに吐き出すコマンドの前に<code>fcache EXPIRE_SEC</code>というのを付け足して実行すると、初回はコマンドを実行して結果をファイルに保存しつつstdoutにも出力します。</p>

<pre><code>$ fcache 10 curl -s example.com
hoge
</code></pre>

<p>次に、同じ<code>fcache</code>コマンドを叩くと、保存されているキャッシュファイルの時刻を見て、expire時刻を過ぎてなければ単にそのファイルの中身をstdoutに吐き出して終了します。</p>

<pre><code>$ fcache 10 curl -s example.com # 実際はcurlは実行されない
hoge
</code></pre>

<p>expire時刻を過ぎていれば初回と同じ動きをしてキャッシュを更新してくれます。<code>flock</code>を使って、読み込みだけなら共有ロックで並列に、書き込みが発生する時には排他ロック、みたいな処理をしてます(が何分まともな排他制御書いたことないのできっとバグってます。。。)</p>

<!-- more -->


<h2>何の役に立つの？</h2>

<p>特に監視の処理の中で、ほぼ同時に並列で1つのAPIを叩く監視項目があった時に、みんなが同じAPIを叩くのは非効率だなぁと思った時に効果があります(つまりニッチ)。何も気にせず<code>fcache</code>コマンドを並列に実行すれば、最初の人がAPIを叩いてキャッシュしてくれて、あとの人はキャッシュを利用してくれます。</p>

<p>例えばZabbixという監視ソフトには<code>UserParameter</code>というagent側でコマンドを実行して数値を返す、みたいなのが定義できます。</p>

<pre><code>$ curl -s localhost
aaa 1
bbb 2
ccc 3

$ cat /path/to/zabbix_agentd.conf
UserParameter=example.key[*],curl -s localhost | grep $1 | cut -f 2
</code></pre>

<p>上の様な設定をしたサーバがあったとすると、<code>zabbix_get</code>で<code>aaa</code>,<code>bbb</code>,<code>ccc</code>の値が取れます。</p>

<pre><code>$ zabbix_get -s server -k example.key[aaa]
1
$ zabbix_get -s server -k example.key[bbb]
2
$ zabbix_get -s server -k example.key[ccc]
3
</code></pre>

<p>ただし、これだと3回<code>curl</code>が呼ばれます。もし<code>curl</code>を減らしたいなら、1つのitemでスクリプトを実行してその中で1回だけ<code>curl</code>してから全てのキーについて<code>zabbix_sender</code>で送る、とかも考えられます。</p>

<pre><code>$ cat /path/to/zabbix_agentd.conf
UserParameter=example.key,/path/to/script # 中でzabbix_senderを複数実行
</code></pre>

<p><code>fcache</code>を使うとシンプルに実現できます。これならキャッシュの有効期間中は<code>curl</code>は叩かれませんし、configも素直です。</p>

<pre><code>$ cat /path/to/zabbix_agentd.conf
UserParameter=example.key[*],fcache 10 curl -s localhost | grep $1 | cut -f 2
</code></pre>

<h2>おわりに</h2>

<p>適当に作った上に、自分で使ってるわけでもないので自己責任でご利用下さい。こういうコンセプトがあってもおもしろいよねという提案がしたかったのと、ちょうどpythonの勉強がしたかったので、自分的には満足です。</p>
]]></content>
  </entry>
  
  <entry>
    <title type="html"><![CDATA[Sonic Notify - a real broadcasting]]></title>
    <link href="http://tech.riywo.com/blog/2013/05/07/sonic-notify-a-real-broadcasting/"/>
    <updated>2013-05-07T21:57:00+09:00</updated>
    <id>http://tech.riywo.com/blog/2013/05/07/sonic-notify-a-real-broadcasting</id>
    <content type="html"><![CDATA[<h2>前置きというか能書き</h2>

<p>アプリ作りたいですよね、アプリ。今日なんか作れないかなーと思って妄想してました。昨日こういうアプリを見かけて、</p>

<ul>
<li><a href="http://veadardiary.blog29.fc2.com/blog-entry-4473.html">iOSデバイスを画面に重ね合わせるだけでファイルの送受信ができる『PutOn Mac』 - Macの手書き説明書</a></li>
</ul>


<p>なるほど、もうTCP/IPで通信できるのは当たり前すぎて、その上でできること考えるよりも、なんか別な通信方法考えるの面白いかもなぁと思いました。</p>

<p>上のアプリは多分映像のチカチカを使って0と1の情報を伝えてるんだと思いますが、だったら音声でもできるよね、と。音声だとブロードキャスト(ひとつの音源で沢山の人に伝えること)できるので映像より面白そう。</p>

<!-- more -->


<ul>
<li><a href="http://awesomegeekblog.blogspot.com/2009/04/file-transfer-over-sound-card-ii-phase.html">Awesome Geek Blog: File transfer over sound card II: Phase Shift Keying</a></li>
</ul>


<p>探してみるとこういうことやってる人がいました。音を鳴らしてその信号にファイルの中身を乗っけて通信してしまうと。でもせっかくだったら人間の可聴域以外を使ってやれると、人間には聞こえないけど機械には聞こえる音であら不思議ファイルが転送できたりしたら魔法っぽくておもしろそう！</p>

<h2>Sonic Notify</h2>

<p>ということで色々下調べを初めて1時間、既にありました。。。しかもすごいのが。</p>

<ul>
<li><a href="http://sonicnotify.com/#!">Sonic Notify</a></li>
</ul>


<p>これまさにさっき上に書いたことそのまんまを既に実現してるみたいです。具体的な技術内容を見つけられてないのですが、アプリの挙動を見るにおそらく人間には聞こえない範囲の音を発生させてると思います。</p>

<p>上記のサイトにあるdemoページの動画を、iPhoneアプリ起動した状態で視聴すると、あら不思議、ところどころで通知がきます。動画の音をミュートにすると通知はきません。</p>

<ul>
<li><a href="http://sonicnotify.com/#!/demos">デモページ</a></li>
</ul>


<p>ユーザ登録すると、自分でも試せるのでやってみました。コンポーネントはこんな感じ。</p>

<ul>
<li>Studio

<ul>
<li>実際のプロモーションを表現してる</li>
<li>Programを追加するとStudioが出来る感じ？</li>
<li>いろんなタイプがある（Live Concert, In-Store Display, Live Sportsなど)</li>
<li>ContentsをStudioに対して指定できる

<ul>
<li>通知を受けた時の情報で画像とタイトル、URLやミニサイトを指定できる</li>
</ul>
</li>
</ul>
</li>
<li>App

<ul>
<li>iOSとAndroidのSDKがあるので、自分のアプリに組み込める</li>
<li>テスト用には、先ほどインストールしたアプリに新しく作成したアプリのGUIDを反映させればOK</li>
</ul>
</li>
<li>Channel

<ul>
<li>実際に信号を送る側の定義</li>
<li>いろんなデバイスを売ってる！

<ul>
<li>コンセントに差すだけのやつ、音声信号の出力ができるやつ、など</li>
</ul>
</li>
<li>テスト用にMacのクライアントアプリを利用した

<ul>
<li>起動して適当に新しいChannel名指定して繋ぐ</li>
</ul>
</li>
</ul>
</li>
</ul>


<p>Program作って、Studio画面でAppとChannelを紐付けたら、多分クライアントアプリから音が出てます。iPhoneのアプリのGUIDを切り替えたら自分の設定した画像とリンクが通知されました。すごい。</p>

<h2>中身推察</h2>

<p>多分、</p>

<ul>
<li>アプリのGUIDが秘密鍵的なものになってる？

<ul>
<li>送信側と受信側で同じ鍵を設定すれば、その信号が取り出せる</li>
</ul>
</li>
<li>最終的に情報取り出す時にクライアントはインターネット通信してる

<ul>
<li>iPhoneをAirplaneモードにしたら受信してくれなかった</li>
<li>Sonic Notifyのサイトにデバイス毎の分析画面とかあるので多分この時情報送ってる？</li>
</ul>
</li>
</ul>


<h2>まとめ</h2>

<p>技術的興味津津なんですが、それはさておき色々使い道のある技術だとは思いませんか？ユースケースとして挙がってる、コンサート会場で観客にプレゼント配布とか、小売店でキャンペーン情報とか、リアルにその場にいる時に受け取ることに価値がある様なものにフィットしそう。</p>

<p>ちょうど今年はiOSアプリに挑戦したいと思ってたので、折を見てこのSDKを組み込んで遊んで見るかもしれませんが、先に人柱誰か！</p>
]]></content>
  </entry>
  
  <entry>
    <title type="html"><![CDATA[mruby on MIPS in PQI Air Pen]]></title>
    <link href="http://tech.riywo.com/blog/2013/05/07/mruby-on-mips-in-pqi-air-pen/"/>
    <updated>2013-05-07T07:40:00+09:00</updated>
    <id>http://tech.riywo.com/blog/2013/05/07/mruby-on-mips-in-pqi-air-pen</id>
    <content type="html"><![CDATA[<p>moyashi さんの記事を読んで以来、ずっと欲しかったPQI Airシリーズなんですが、USのAmazonでは売ってなかったり無駄に高かったりして二の足を踏んでました。ある日、郵便局を使うと数百円で荷物が送れることが分かったので、日本のAmazonで買って実家に発送して送ってもらうことでついにゲットしました。</p>

<ul>
<li><a href="http://hitoriblog.com/?p=12627">ひとりぶろぐ » デジカメ内部でRubyを動かす狂気！無線LAN内蔵SDカードアダプタPQI Air Cardの間違った使い方</a></li>
<li><a href="http://hitoriblog.com/?p=15926">ひとりぶろぐ » ポケット無線LANルータの新顔PQI Air Penの著しく間違った使い方</a></li>
</ul>


<p>ただ、Cardの方を動かせるmicroSDを持ってなかったので、今はPenでちょっと遊んでみただけです。何をやったかというと、<code>mruby</code>を動かしてみました。CRubyはちょっと動かせる自信なかったですが、最初から組み込み向けの<code>mruby</code>なら簡単かなぁと思ってやってみたら簡単でした。</p>

<!-- more -->


<h2>Cross Compile</h2>

<p>PQI AirのハードウェアはCPUがMIPSで、使い慣れているx86/x86_64とは違います。ので単にいつもLinuxで使ってるバイナリをコピーしてもダメです。</p>

<pre><code># cat /proc/cpuinfo
system type             : Atheros AR9330 (Hornet)
processor               : 0
cpu model               : MIPS 24Kc V7.4
BogoMIPS                : 232.96
wait instruction        : yes
microsecond timers      : yes
tlb_entries             : 16
extra interrupt vector  : yes
hardware watchpoint     : yes, count: 4, address/irw mask: [0x0000, 0x0c68, 0x0ff8, 0x0393]
ASEs implemented        : mips16
shadow register sets    : 1
core                    : 0
VCED exceptions         : not available
VCEI exceptions         : not available
</code></pre>

<p>さすがにここでコンパイルするのは、その環境を準備するところで挫折しそうなのでクロスコンパイル(別のアーキテクチャ用のバイナリをコンパイルする)をしました。</p>

<p>やり方はmoyashiさんが紹介されているSourcery CodeBenchというツールチェインを使って静的リンクでコンパイルしただけです。楽チン。</p>

<ul>
<li><a href="http://www.mentor.com/embedded-software/sourcery-tools/sourcery-codebench/editions/lite-edition/">Sourcery CodeBench Lite Edition - Mentor Graphics</a></li>
</ul>


<p>Macで動かすにはこれ自体をセルフビルドする必要があったので萎えて、Vagrantで適当に32bit Linuxを起動して、インストール。適当に<code>PATH</code>を通しておきます。以下は<code>Vagrantfile</code>の例。</p>

<pre><code>$ cat Vagrantfile
Vagrant.configure("2") do |config|
  config.vm.box = "precise32"
  config.vm.box_url = "http://files.vagrantup.com/precise32.box"
  config.vm.provision :shell, :inline =&gt; "apt-get install build-essential -y"
end
$ vagrant up
$ vagrant ssh
</code></pre>

<p><code>mruby</code>は最近ビルド方法が変わったらしく、rubyが必要なのでこれも適当に。Vagrantのboxだと大抵入ってるかな。あと必要なパッケージも適当に。Vagrantfileに書いといてもいいね。</p>

<pre><code>$ sudo apt-get install bison git
</code></pre>

<p>これで適当にクロスコンパイルの準備ができました。</p>

<h2>make mruby</h2>

<p>とりあえずコード取ってきます。</p>

<pre><code>$ git clone https://github.com/mruby/mruby.git
$ cd mruby
</code></pre>

<p><code>mruby</code>は<code>build_config.rb</code>というファイルでコンパイルの方法を色々変えられます(多分)。今回は以下を追加してみました。意味は簡単でMIPS用の<code>gcc</code>や<code>ar</code>が先ほどのSoucery CodeBenchに入ってるので、それを適当なオプションとともに指定してるだけです。</p>

<pre><code>MRuby::CrossBuild.new('pqi-air') do |conf|
  toolchain :gcc

  conf.gembox 'default'
  conf.cc.command = "mips-linux-gnu-gcc"
  conf.cc.flags &lt;&lt; %w(-g -O2 -Wall -static -march=24kc)
  conf.linker.command = "mips-linux-gnu-gcc"
  conf.linker.flags &lt;&lt; %w(-s -static)
  conf.archiver.command = "mips-linux-gnu-ar"
end
</code></pre>

<p>もともとある<code>MRuby::Build</code>の方を消すと<code>undefined method 'build_dir' for nil:NilClass</code>なるエラーになってしまうのでそれも残しておきます(何かやり方間違ってる気が。。。)</p>

<p>あとは<code>make</code>したらできあがり。</p>

<pre><code>$ make
ruby ./minirake
(in /home/vagrant/mruby)

Build summary:

================================================
      Config Name: pqi-air
 Output Directory: build/pqi-air
         Binaries: mrbc
    Included Gems:
             mruby-sprintf
             mruby-print
             mruby-math
             mruby-time
             mruby-struct
             mruby-enum-ext
             mruby-string-ext
             mruby-numeric-ext
             mruby-array-ext
             mruby-hash-ext
             mruby-range-ext
             mruby-proc-ext
             mruby-symbol-ext
             mruby-random
             mruby-bin-mirb
               - Binaries: mirb
             mruby-bin-mruby
               - Binaries: mruby
================================================

$ file build/pqi-air/bin/*
build/pqi-air/bin/mirb:  ELF 32-bit MSB executable, MIPS, MIPS32 rel2 version 1, statically linked, for GNU/Linux 2.6.12, with unknown capability 0x41000000 = 0xf676e75, with unknown capability 0x10000 = 0x70401, stripped
build/pqi-air/bin/mrbc:  ELF 32-bit MSB executable, MIPS, MIPS32 rel2 version 1, statically linked, for GNU/Linux 2.6.12, with unknown capability 0x41000000 = 0xf676e75, with unknown capability 0x10000 = 0x70401, stripped
build/pqi-air/bin/mruby: ELF 32-bit MSB executable, MIPS, MIPS32 rel2 version 1, statically linked, for GNU/Linux 2.6.12, with unknown capability 0x41000000 = 0xf676e75, with unknown capability 0x10000 = 0x70401, stripped
</code></pre>

<h2>実行！</h2>

<p>あとは出来上がったフォルダ一式(と言いつつ静的リンクした実行ファイルしか試してませんが。。。)をPQI Air Penに挿したSDカードにコピーしたら実行！</p>

<pre><code># ./mruby -e 'p 1+1'
2
# ./mirb
mirb - Embeddable Interactive Ruby Shell

This is a very early version, please test and report errors.
Thanks :)

&gt; a = {:foo =&gt; 1, :bar =&gt; 2}
 =&gt; {:foo=&gt;1, :bar=&gt;2}
&gt; a.each { |k,v| p "#{k} =&gt; #{v}" }
"foo =&gt; 1"
"bar =&gt; 2"
 =&gt; {:foo=&gt;1, :bar=&gt;2}
</code></pre>

<p>感動的ですね、こんなちっこいマシンの上でrubyが動くなんて。<code>mirb</code>は<code>readline</code>がないせいか、カーソルキー効かなくて不便ですが。。。</p>

<p><code>mruby</code>のことは実はさっぱり分かってないのですが、色々楽しめそうです。興味ある方はぜひ遊んでみて下さい or 遊び方教えて下さい。</p>

<iframe src="http://rcm-jp.amazon.co.jp/e/cm?lt1=_blank&bc1=000000&IS2=1&bg1=FFFFFF&fc1=000000&lc1=0000FF&t=futuristamazo-22&o=9&p=8&l=as4&m=amazon&f=ifr&ref=ss_til&asins=B00BNAST0O" style="width:120px;height:240px;" scrolling="no" marginwidth="0" marginheight="0" frameborder="0"></iframe>


<iframe src="http://rcm-jp.amazon.co.jp/e/cm?lt1=_blank&bc1=000000&IS2=1&bg1=FFFFFF&fc1=000000&lc1=0000FF&t=futuristamazo-22&o=9&p=8&l=as4&m=amazon&f=ifr&ref=ss_til&asins=B009HF63GE" style="width:120px;height:240px;" scrolling="no" marginwidth="0" marginheight="0" frameborder="0"></iframe>

]]></content>
  </entry>
  
  <entry>
    <title type="html"><![CDATA[webtail + ncat = simple log monitoring!]]></title>
    <link href="http://tech.riywo.com/blog/2013/04/23/webtail-plus-ncat-equals-simple-log-monitoring-slash/"/>
    <updated>2013-04-23T18:58:00+09:00</updated>
    <id>http://tech.riywo.com/blog/2013/04/23/webtail-plus-ncat-equals-simple-log-monitoring-slash</id>
    <content type="html"><![CDATA[<p><a href="https://github.com/r7kamura/webtail">webtail</a> is a super simple log monitoring tool. You can monitor a log streaming on a server via your web browser.</p>

<p>I wanted to monitor multi servers log, so I tried <code>ncat</code> in <code>mmap</code>. <code>ncat</code> supports multi sessions.</p>

<ul>
<li><a href="http://nmap.org/ncat/">Ncat - Netcat for the 21st Century</a></li>
</ul>


<!-- more -->


<p>Here is an example.</p>

<pre><code>## monitor server
mon&gt; ncat -l -k 10000 | webtail

## web servers
web1&gt; tail -F access_log | sed -e 's/^/web1 /' | nc mon 10000
web2&gt; tail -F access_log | sed -e 's/^/web2 /' | nc mon 10000
web3&gt; tail -F access_log | sed -e 's/^/web3 /' | nc mon 10000
</code></pre>

<p>You can monitor all web servers logs with a single web page.</p>

<p>Enjoy!</p>
]]></content>
  </entry>
  
  <entry>
    <title type="html"><![CDATA[python mox example]]></title>
    <link href="http://tech.riywo.com/blog/2013/04/19/python-mox-example/"/>
    <updated>2013-04-19T19:55:00+09:00</updated>
    <id>http://tech.riywo.com/blog/2013/04/19/python-mox-example</id>
    <content type="html"><![CDATA[<p>Pythonの小さいスクリプトを書いたんですが、せっかくなんでテストも書いてみようと思ってあがいたメモ。やりたかったのは、スクリプトの中で行ってるIO(ファイルとIPC)をテスト中は上書きして、テストデータを返す、みたいなこと。</p>

<!-- more -->


<p>初めは<code>mock</code>というのでやってたんですが、<code>subprocess.Popen()</code>がさらにメソッドを呼び出す形で使うのでどうやってやったらいいのか分からなくて、<code>mox</code>を使ってとりあえずできたのでそれを記録。</p>

<p><code>Example.run()</code>は、ファイルを読み込んだ内容とコマンド実行結果をつなげて返すだけ。</p>

<script src="https://gist.github.com/riywo/5424458.js"></script>


<p>もっとスマートなやり方やオススメもモジュールがあればぜひ教えてくださいませ〜</p>

<p>cf. <a href="http://stackoverflow.com/questions/5237693/mocking-openfile-name-in-unit-tests">python - Mocking open(file_name) in unit tests - Stack Overflow</a></p>
]]></content>
  </entry>
  
</feed>